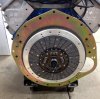
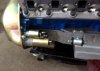
Centerforce diaphragm pressure plate and Centerforce 10.4" Dual friction clutch. Organic/ceramic.
Navigation
Install the app
How to install the app on iOS
Follow along with the video below to see how to install our site as a web app on your home screen.
Note: This feature may not be available in some browsers.
More options
-
Hello there guest and Welcome to The #1 Classic Mustang forum!
To gain full access you must Register. Registration is free and it takes only a few moments to complete.
Already a member? Login here then!
You are using an out of date browser. It may not display this or other websites correctly.
You should upgrade or use an alternative browser.
You should upgrade or use an alternative browser.
Mach1Mark's '65 coupe restomod
- Thread starter Mach1Mark
- Start date
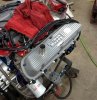
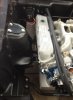
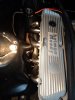
Today, we began installing the bell housing and clutch assembly. Installed the aluminum flywheel and aligned the bell housing. Discovered that I bought a pressure plate with a standard Ford bolt pattern Of course my fancy aftermarket flywheel has a different bolt pattern. Need to return the clutch and pressure plate and obtain one that fits. Also installed my Holman-Moody aluminum valve covers. Racy !!
Attachments
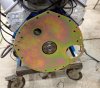

. Discovered that I bought a pressure plate with a standard Ford bolt pattern Of course my fancy aftermarket flywheel has a different bolt pattern. Need to return the clutch and pressure plate and obtain one that fits. !!
See TERRY, I told you.
Sent from my stupid phone
You aren't seriously imply, in public no less, that you were right and i was wrong, are you?See TERRY, I told you.
So for clarification purposes, what bolt pattern does that flywheel require?
Very cool tool, Mark. I didn't know something like that even existed. Now I want one and don't even have the need. It's a sickness.
You aren't seriously imply(ing), in public no less, that you were right and i was wrong, are you?
Not in the least!
You aren't seriously imply, in public no less, that you were right and i was wrong, are you?
So for clarification purposes, what bolt pattern does that flywheel require?
Very cool tool, Mark. I didn't know something like that even existed. Now I want one and don't even have the need. It's a sickness.
The Fidanza flywheel I went with is the only one they make for 'old' Windsor family Ford motors and is 164 teeth which allows the use of 10.5" or 11" clutch discs. The outer pattern is 6 holes spaced at 60 degrees. The inner pattern is also 6 holes but they are grouped in pairs a couple of inches apart spaced at 120 degrees group center to group center. The hole size & threads are the same (5/16"x18 IIRC). Since this issue came up Ive reconsidered and am going with an 11" clutch.
I didnt know about the Browell tool either, Terry until our fellow 'Fixer and resto-modder Ryan (Monkeystash) shared with me its what he used. Its pretty simple and accurate. The tolerances were so tight we had to warm up the silver centering ring that came with the bell housing to get it to slide over the black anodized ring.
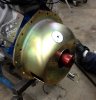
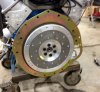
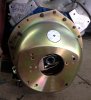
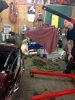
Today I installed the (2nd) Centerforce II clutch and pressure plate. This time it fits. Cleaned the accumulated dust & grime from the engine bay because tomorrow I am going to install the motor.
Attachments

guruatbol
Always on vacation!
Nice!
Mel
Sent from my DROID RAZR HD using Tapatalk 2
Mel
Sent from my DROID RAZR HD using Tapatalk 2
monkeystash
Active Member
Was your bellhousing in spec or did you need offsets?
Was your bellhousing in spec or did you need offsets?
I'm glad I ordered the offset dowels, I needed them. They were 0.021" offset and I thought they weren't going to work but we kept adjusting with them until the bell housing lined up.
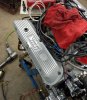
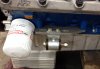
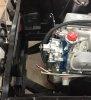
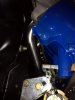
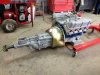
The EAGLE has LANDED !!! Installed my engine today !! Went in very easy too. LOTS of room !!! I was expecting a very tight fit since the deck height of the 351W-based engine is one inch higher than the 289-based engine that came in this car. Installed the mini starter, clutch fork and throw out bearing. Tightened all the bell housing bolts.
Attachments
Huge day for you. Congrats!
You think you have tons of room. Wait until you try to get hose headers installed.
You think you have tons of room. Wait until you try to get hose headers installed.
guruatbol
Always on vacation!
Looks like your room is evaporating! The minute you put your exhaust on, there goes the room!
Mel
Sent from my DROID RAZR HD using Tapatalk 2
Mel
Sent from my DROID RAZR HD using Tapatalk 2
Grabber70Mach
Well-Known Member
Congrats on the milestone.
Ponyman66
Yak, yak, yak
Congrats Mark!
monkeystash
Active Member
Awesome, great progress! I'll be interested to see if you need to clearance the headers, or change your upper control arm bolts.
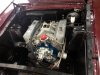
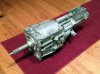
Today I managed to get the shorty headders installed. Not extremely difficult but requires knowledge, patience and persistence. It required that I lift the engine on one side and insert the headder from below. Three hands would have been a help but I got them in. Also received word that my custom T-5 transmission is ready for pick-up. I guess we will be installing that next weekend.
Attachments

Room to spare.
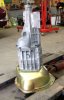
Had a minor set back this week: the pilot bearing was the wrong inside diameter for the transmission input shaft. Had to pull the motor after removing the hedders, then remove the bell housing and clutch assy. Had to destroy the pilot bearing to removed it. Once the new (correct) pilot bearing was installed I had to re-align the clutch assy and then check the alignment of the bell housing. Everything fits now and is aligned. Never trust a parts counter guy you dont know. Check the fit of EVERYTHING before you install it !! Tomorrow I will re-install the motor and hedders, then install the transmission.
The good news from this is I decided to check the starter and it is set-up for an automatic transmission. Since it was a gift from a 'Fixer I will see if I can change the cast head portion or if need be buy a correct mini starter.
The good news from this is I decided to check the starter and it is set-up for an automatic transmission. Since it was a gift from a 'Fixer I will see if I can change the cast head portion or if need be buy a correct mini starter.
Attachments
Last edited: