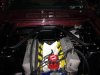
Got the motor and hedders re-installed in the Mustang. Lets hope that is the last time I need to do that for a while.
Navigation
Install the app
How to install the app on iOS
Follow along with the video below to see how to install our site as a web app on your home screen.
Note: This feature may not be available in some browsers.
More options
-
Hello there guest and Welcome to The #1 Classic Mustang forum!
To gain full access you must Register. Registration is free and it takes only a few moments to complete.
Already a member? Login here then!
You are using an out of date browser. It may not display this or other websites correctly.
You should upgrade or use an alternative browser.
You should upgrade or use an alternative browser.
Mach1Mark's '65 coupe restomod
- Thread starter Mach1Mark
- Start date
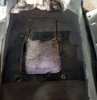
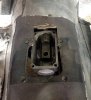
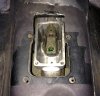
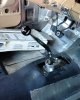
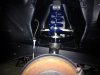
Trimmed the OEM shifter opening in the floor to give me a little more room to install the T-5 shifter. installed the Steeda Tri-Ax shifter and adjusted the stops. Also installed a pair of new halogen headlights.
Attachments

Last edited:
Hmmm. Your shifter location appears to be at least an inch further toward than front than mine. Mine lined up damn near perfect in the stock hole. Granted I used adjustable mounts but I don't recall ever seeing anyone have to do that kind of butchering with a T5. Usually just a bit of trimming on the side of the stock hole. Trying to understand what is different with your situation.
Terry
I used adjustable motor mounts as well and the JBA headers seem to be the reason I had to move the motor forward. I was having a clearance problem between the driver side collector and the steering. tilted the motor a little and moved it forward. I was surprised at the need for as much trimming as I had to do. I had at least one other resto modder say he only had to trim about a three quarters of an inch from the original opening. Also, I didn't attach the shifter with the trans out of the car, I waited until I got everything installed. Probably the main reason for the size of the hole.
I used adjustable motor mounts as well and the JBA headers seem to be the reason I had to move the motor forward. I was having a clearance problem between the driver side collector and the steering. tilted the motor a little and moved it forward. I was surprised at the need for as much trimming as I had to do. I had at least one other resto modder say he only had to trim about a three quarters of an inch from the original opening. Also, I didn't attach the shifter with the trans out of the car, I waited until I got everything installed. Probably the main reason for the size of the hole.
Thanks for the explanation, Mark. I'm just that kind of moron who tries to understand everything he can. Never know when it might come in useful. Save the comment  !
!
I wonder how tight things will end up on the front side. Have you seen/expect any issues with fan clearance? I know on mine I wouldn't have the room to spare.
!I wonder how tight things will end up on the front side. Have you seen/expect any issues with fan clearance? I know on mine I wouldn't have the room to spare.
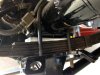
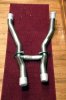
Had a good day in the garage yesterday, installed the Hurst shifter and knob, installed the Bilstein shocks on the axle, installed a pair of 4 degree axle shims and installed the Caltracs traction bars. Also checked the brake lines near/on the axle for tightness.
Attachments
Last edited:
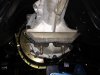
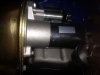
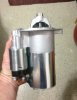
More progress today, started yesterday by degreasing the OEM transmission support and other various C4 parts. Had to mod the support to clear an interference on the new T-5 transmission. When I bolted the support to the T-5 it was like it was made to fit 50 years ago. And then the connection to the new custom trans support was perfect. Alll snug and ready for the driveshaft measurements I need.
Attachments
-
 OEM C4 trans mount modded (1).JPG533.4 KB · Views: 23
 -
 OEM C4 trans mount modded (2).JPG592.9 KB · Views: 24
 -
 OEM C4 trans mount modded (3).JPG604.7 KB · Views: 24
 -
 T-5 mount n suppt (1).JPG478.6 KB · Views: 26
 -
 T-5 mount n suppt (2).JPG803.3 KB · Views: 25
 -
 T-5 mount n suppt (3).JPG469.8 KB · Views: 23
Last edited:
monkeystash
Active Member
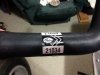
The H-pipe is a real nice piece. I did need to grind a bit on my trans x-member to get it to tuck up tight.
Sent from my iPad using Tapatalk
Sent from my iPad using Tapatalk


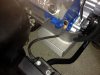
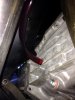
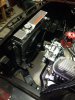
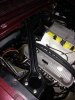
Yesterday I filled the oil pan with fresh Valvoline 50w racing oil, replaced the FL-1A filter with a new one and filled the transmission with ATF and additive. I also test fit the stainless band clamp on the H-pipe exhaust. Today, I installed the ground wire for the engine and a couple of other small tasks.
Attachments
Last edited:
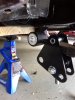
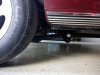
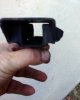
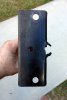
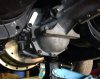
Today I finally finished installing the rear shocks (note: Bilstein shocks made in USA have METRIC threads !!). A couple of minor issues during the install process but I can check them off the list. Also removed the H-pipe to allow me to remove the transmission x-member. Had to remove the e-brake bracket as it interferred with the H-pipe. Will come up with a solution to a new e-brake bracket. Yesterday I did install the proper size stainless band clamp on the H-pipe. Fits perfectly.
Last edited:
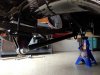
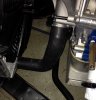
Today I finished blending the finish on the x-member. Looks GREAT. I reinstalled the x-member and the H-pipe which now tucks up close to the underside of the car. Not sure how I can solve the e-brake bracket problem. Next up: re-set the motor mounts as it appears they aren't seated properly (my buddy Tom helped in this area while I was out-of-town). Im also going to attempt to move the motor rearward 1/2" in order to have some more room in front of the water pump.
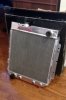
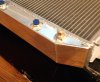
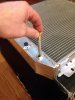
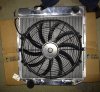
After a long pause (due to unemployment), I ordered a new 4 core Champion brand aluminum radiator last week. It arrived Wednesday and I installed it tonight along with the sacrificial anode plug. Shouldnt have ANY cooling problems in the summer !!
Attachments
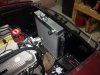
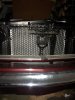
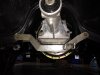
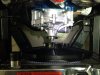
Over the last few weeks I have come to the conclusion that I would have to replace my new, hi-flow water pump with a standard flow Ford Racing pump that is 1.5" shorter in order to accommodate the electric fan. The thinnest electric fan Ive found is by Maradyne and it measures 16" dia x 2 7/8" deep. Today I installed the fan and test fit the new water pump.
Attachments
Last edited:
Last Sunday I started to loosen the coil shock mount bolts on one side to begin the install of the export brace. Didn't know it would entail having to pull the shock. Today got the shock on the other side out and loosely installed all the export brace bolts. Then tightened them. Since the shocks are out I am going to take this opportunity to clean the surfaces inside the fenders. They are covered with over a year of shop grime from when the Colt was still at my buddy Tom's shop after paint. Also made a wire model of the needed lower radiator hose, went to O'Reillys and found a suitable hose. Trimmed it and test fit. Perfect fit.
Attachments
Today I installed the passenger side rear seat quarter trim panel. Checked the installation of the rear quarter window for fit and travel. Installed windlace trim. Reinstalled pass side coil over shock after cleaning all the parts and inside the fender.
Attachments

Nice!!
Sent from my stupid phone using Tapatalk
Sent from my stupid phone using Tapatalk