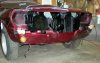
Today, we began to glue the headliner in place, I installed the hood latch, latch support and adjusted the catch and bumpers, I did the final install of the fuel tank, filler neck and gas cap, installed some small (new) pieces on the rear of the car.
Navigation
Install the app
How to install the app on iOS
Follow along with the video below to see how to install our site as a web app on your home screen.
Note: This feature may not be available in some browsers.
More options
-
Hello there guest and Welcome to The #1 Classic Mustang forum!
To gain full access you must Register. Registration is free and it takes only a few moments to complete.
Already a member? Login here then!
You are using an out of date browser. It may not display this or other websites correctly.
You should upgrade or use an alternative browser.
You should upgrade or use an alternative browser.
Mach1Mark's '65 coupe restomod
- Thread starter Mach1Mark
- Start date
Yesterday, we finished gluing the headliner in place. the front half looks more taut than the back half. Not bad for a first install.
Today, installed the rear glass and new seal, installed rear valance bolts and tightened valance attaching screws, installed restored door window stainless trim and new door window seals, installed restored grill support piece.
Not sure if these are the original pieces from my Colt but they are Ford (not repro). Detailed, new gaskets, new attaching hardware. Will upgrade later to LED bulbs.
Installed the turn signal housings on the front valance, installed the back-up lights, installed the gas cap lock (Drake).
Note: Backup light housings are RH/LH and so are the turn signal housings/retainers/body gaskets. They wont fit right if you put them on the wrong side.
Installed the turn signal housings on the front valance, installed the back-up lights, installed the gas cap lock (Drake).
Note: Backup light housings are RH/LH and so are the turn signal housings/retainers/body gaskets. They wont fit right if you put them on the wrong side.
Ponyman66
Yak, yak, yak
Gettin' close Mark!! I spent last week in Columbia going to a class. To bad I didn't get a chance to get up your way and check it out in person. BTW, that gas cap lock is pretty sweet. I think I found another thing to add to my coupe!!
Saturday I glued in the window-to-roof weather strips, Today, I installed the (original) wiper motor/bracket under the dash and the chrome trim pieces on the cowl around the wiper arm posts. I cut new foam gaskets for the wiper pivots (using the old cork gaskets as a template) for where they penetrate the cowl. That was unnecessary because I had bought new rubber gaskets but it was fun.
What a struggle !! When I removed this motor/bracket a year ago I noticed that there were three bolts attaching when there should have been four. Apparently the assembly line worker didn't have enough time to properly align the bracket to accept the last bolt. After about an hour of trial and error I got all four bolts secured. I guess I wont be working on the assembly line unless I get my installation speed up . . .
What a struggle !! When I removed this motor/bracket a year ago I noticed that there were three bolts attaching when there should have been four. Apparently the assembly line worker didn't have enough time to properly align the bracket to accept the last bolt. After about an hour of trial and error I got all four bolts secured. I guess I wont be working on the assembly line unless I get my installation speed up . . .
Last Sunday, I installed the brake line fitting adapter fittings on the new master cylinder, the power steering hoses on the rack, the front bumper brackets (had to scrounge for bolts and washers as they've been lost long ago) and the glove box door. Thought about what I should have been doing which was gluing in the door window weatherstrips . . . next week I guess.
Note: Master cyl is from a 2000 Mustang w/o traction control, the brass fittings are M10x1.0 to 3/8"x24; NAPA p/n 641-5026; ~$2.50/ea.
Note: Master cyl is from a 2000 Mustang w/o traction control, the brass fittings are M10x1.0 to 3/8"x24; NAPA p/n 641-5026; ~$2.50/ea.
Ponyman66
Yak, yak, yak
Mark I don't know if you like how the pressure line connects to your pump or not. Personally, I don't care for the banjo fitting and line running across the back of a spinning pulley! If you have the same concern, I figured I'd share a piece that I'm seriously considering to replace the Unisteer fitting:
http://www.olddogstreetrods.com/osc/cat ... s_id=77512
It also gives a little more length to the pressure line they supply you with.
http://www.olddogstreetrods.com/osc/cat ... s_id=77512
It also gives a little more length to the pressure line they supply you with.
Tonight I detailed both quarter windows and installed new weather strips. Ready to install back into the car.
Ponyman66
Yak, yak, yak
Mark did you have your quarter window frames rechromed?
I thought about it, but part of the frames are stainless and the chrome portion wasn't really unsightly (very minor corrosion). And since Im not trying to restore to concours I figured I could live with it.
Ponyman66
Yak, yak, yak
Gotcha. It's looking good! :thu
Completed installation of pass side quarter window. After almost 35 years this window finally rolls all the way up (replaced broken crank mechanism). This install wasn't as difficult as I feared. The other side will go faster.
Restored heater plenum is now ready to be installed.
Restored heater plenum is now ready to be installed.
Completed the install of the driver side quarter window and new weather stripping all around (no, it didn't go faster but at least I more familiar with the drill), installed the rocker molding brackets, both sides, installed some sound deadener in the trunk.
Finished the install of the new firewall pad, installed the restored heater plenum (went in easy doing it my myself), installed the heater/vent controls, installed more sound deadener on the rear seat floor.
Sorry about the looooong absence . . . we bought a new house and Ive been very busy getting it ready to occupy and currently unpacking.
Latest progress includes installing new seals on the front splash guards (pics to come when they are complete) and affixing my tribute sticker for my dad.
Latest progress includes installing new seals on the front splash guards (pics to come when they are complete) and affixing my tribute sticker for my dad.
Attachments
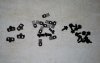
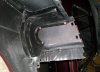
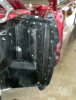
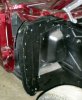
Last Sunday I finished attaching the new rubber seals to the cleaned/repainted splash guards that install inside the front fenders. Also received the new hardware to attached the fenders to the unibody.
Attachments

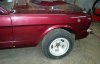
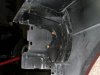
Yesterday I was successful in my efforts to coax the new passenger side fender into place. It now fits as good as it is able after a little grinding, hammering and bending. Used Ford tooling fenders and they are close but not the same fit as original fenders. The biggest mis-fit is the door-to-fender gap and the top of fender edge nearest the windshield. Door gap is a little wide and the top of fender needed some substantial bending to match up with the top-of-door contour.
Pics after we get the driver side installed.
Pics after we get the driver side installed.
I should have posted this on Sept 23rd when I did the work:
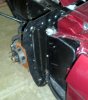
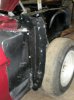
I installed the front splash guards on the fenders and the unibody, my son Brolin assisted with the media stripping of the original fasteners after which I primered and painted them. Then he and Tom Mc assisted with the trial fit of the fenders and all the fasteners to the unibody. It appears that both (new) fenders need some coaxing and massaging to fit properly.
I installed the front splash guards on the fenders and the unibody, my son Brolin assisted with the media stripping of the original fasteners after which I primered and painted them. Then he and Tom Mc assisted with the trial fit of the fenders and all the fasteners to the unibody. It appears that both (new) fenders need some coaxing and massaging to fit properly.
Attachments
-
 Driver side splash guards (1).JPG977.3 KB · Views: 247
 -
 Pass side splash guards (2).JPG736 KB · Views: 229
 -
 Headlite splash guards (2).JPG734.1 KB · Views: 31
 -
 Headlite splash guards (1).JPG815.6 KB · Views: 31
 -
 Driver side splash guards (2).JPG1.1 MB · Views: 31
 -
 Pass side splash guards (1).JPG953.6 KB · Views: 34
Installed new trunk floor extension, installed new hood hinges (massaged the bolt holes) in an effort to get the hood to line up better with the cowl, test fitted the front valance.