• Hello there guest and Welcome to The #1 Classic Mustang forum!
    To gain full access you must Register. Registration is free and it takes only a few moments to complete.
    Already a member? Login here then!

1967 Build called Electra

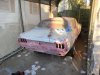
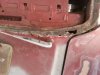
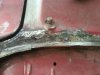
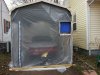
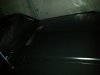
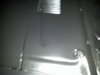
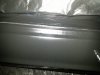
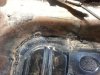
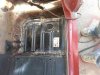
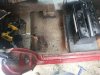
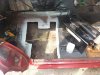
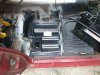
Well i got back to the floor panels and made them a little worse. My cutting messed up and i create a couple big gaps. However it still had enough to be welded in so i welded her in and will go back and fix the gaps later. Its HOT out and 3.5hrs later im done for the day.....Especially after putting in a morning round at the boxing gym.
 

Attachments

  • reargapweld.jpg
    reargapweld.jpg
    48 KB · Views: 58
  • reargapweld2.jpg
    reargapweld2.jpg
    37.4 KB · Views: 53
  • rearweld.jpg
    rearweld.jpg
    44.8 KB · Views: 51
woohoo! Got great news today! I should have all the paperwork I need to get her titled in about 3 weeks
 
you should really consider cleaning up the metal before you weld it in, you risk the weld not taking (poping,etc.) prob wont happen just a thought. Keep up the good work to hot for me thats for sure lol
 
"rotted66" said:
you should really consider cleaning up the metal before you weld it in, you risk the weld not taking (poping,etc.) prob wont happen just a thought. Keep up the good work to hot for me thats for sure lol

I always wire wheel the metal before I weld....Its in there strong thats for sure...Ive yanked and stood on it to make sure but with a crap 90 watt welder things never look pretty... lol
 
Well yesterday I got to work and got all the gaps filled in the driver side.

Today I started on the passenger side. Got it cut out, cleaned up, painted with weld-thru primer, and then got the pan spot welded in place before the rain started. So that's it but progress...
 

Attachments

  • pass cut out.jpg
    pass cut out.jpg
    47.4 KB · Views: 30
  • pass side primer.jpg
    pass side primer.jpg
    45.4 KB · Views: 34
  • pass weld in.jpg
    pass weld in.jpg
    41.3 KB · Views: 33
Well the good news is i finally finished welding in the floor panels. The bad news is she wont start anymore. I suspect the battery to be near dead as the corrosion to the alternator is BAD!! The wire was almost breaking by barely touching it. Either way I have a new Concour headlight wiring harness, headlight switch, and dimmer switch here waiting to be installed. I also ordered a new alternator wiring harness so i could get rid of all the crazy rigged up tap and bad wires. Just to be on the safe side I ordered a new solenoid as well. So soon ill be re-wiring all that junk and probably charging the battery.
 
Ummm...welding on a car with an installed battery that is hooked up is not a particularly good idea.
 
It's not so much the battery but the electrical components attached to the battery. You're now applying a shitload more volts to the system than it was designed for and can blow out sensitive electronics.
 
SHES ALIVE!!!! I replaced the alternator wiring harness, replaced the whole headlight harness, and took the battery to Advanced to have it charged. She fired right up like it was nobodies business. The the problem with the right side being dimmer now seems to be gone as well as the problem with the right blinker not working with the headlights on. It was a ground issue specifically the ground for the alt was missing. The ground floats back into the headlight harness and ground on the other side as well. So yeah the right side wasnt grounded causing the issues
 

Attachments

  • 20131005_153841.jpg
    20131005_153841.jpg
    1.7 MB · Views: 28
  • headlights.jpg
    headlights.jpg
    83.8 KB · Views: 23
I'm not sure where the proper location is for that ground lug, but I strongly suspect it should not be on that head mounting bolt. When the cylinder heads are installed on the block, there is a very specific sequence to tightening all those bolts to very specific torque settings. Once set, you should never touch those bolts again unless you are going to pull the heads off. I doubt you did any damage, but I would remove the ground lug from there since it likely a softer metal that will loosen the torque setting over time. You run risk of blowing a head gasket if the seal is lost. I beleive there are some 3/8 -16 bolt holes on the lower portion of the engine block that you could secure that ground lug too. I'm sure one of the guys more familiar with original wiring can tell you where the proper mounting location is...
 
Look for a large bolt at the bottom of the block, on the passenger side right behind where the alternator goes.
 
Well I moved the ground. There was a spot just like midlife said. Of course the bolt was missing but luckily i had one that fit. Also started her back up to make sure she still started and the ground was solid. I did sand the location before i put the new ground on...:)

Thanks!
 
Got the tires and rear adapter plates installed. 225/45 on front 245/45 on rear. No more rubbing
 

Attachments

  • 1382163_10153335620230521_816593811_n.jpg
    1382163_10153335620230521_816593811_n.jpg
    35.5 KB · Views: 23
been sanding a lot
 

Attachments

  • 20131109_160547.jpg
    20131109_160547.jpg
    2.8 MB · Views: 21
  • 20131109_160537.jpg
    20131109_160537.jpg
    1,021.6 KB · Views: 22
Well a lot more sanding has been done.

Removed the front windshield and discovered a big hole. So welded i shut and did some grinding on it. Also noticed that both Pillars had been replaced at some point...craziness

The whole car got its initial sanding completed other then hand sanding areas like the headlight areas and such. Car has skim coats over all the needed areas.

Now to sand the bondo in a few days and get those other areas
 

Attachments

  • 20131111_122633.jpg
    20131111_122633.jpg
    1.7 MB · Views: 28
  • 20131111_140608.jpg
    20131111_140608.jpg
    1.7 MB · Views: 25
  • 20131111_163908.jpg
    20131111_163908.jpg
    2.2 MB · Views: 34
  • 20131111_163336.jpg
    20131111_163336.jpg
    2 MB · Views: 30
Nope....I dont have that type money.....Just been working with what I have which seems pretty solid but there certainly in bondo in some areas. No signs of too much craziness though.

I did sand off all the PO primer though :)
 
Fucked up painting my car....Ran out of light, leaned the sprayer too far and dripped all over the door, kinked up the hose and sprayed crap on the cowl...BLAH!!! Lots of orange peal, probably missed spots, and ran out of hardner so only got two coats.....BLAH effin blah... If im lucky ill have a 20fter Blitz Black FAIL!!! lol ok ok....Too be honest I should of not tried to do this is my 9ft wide car port....I didnt have enough room and tripped all over...O well
 

Attachments

  • 577313_10153493045455521_2059195005_n.jpg
    577313_10153493045455521_2059195005_n.jpg
    113.3 KB · Views: 34
  • 1454674_10153494099255521_176711805_n.jpg
    1454674_10153494099255521_176711805_n.jpg
    72.7 KB · Views: 32
  • 1146672_10153494098715521_1811581847_n.jpg
    1146672_10153494098715521_1811581847_n.jpg
    76 KB · Views: 33
  • 1476064_10153494098830521_1195974026_n.jpg
    1476064_10153494098830521_1195974026_n.jpg
    88.5 KB · Views: 30
Back
Top