• Hello there guest and Welcome to The #1 Classic Mustang forum!
    To gain full access you must Register. Registration is free and it takes only a few moments to complete.
    Already a member? Login here then!

Trunk lid trim update -Installed !!!

cmayna

DILLIGARA?
Donator
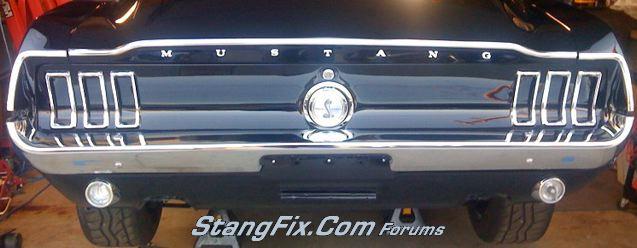
OK, I have a scott drake trunk lid trim piece + fasteners. Do I slide the 7 nylon fasteners into the trim from the end and space them out to match the 7 square holes in the trunklid? You just push the fasteners into the square holes? My kit also came with small cylindrical pieces which looks like they would be pushed into the holes of the 7 nylon fasteners but I question why? According to my body assembly manual, I do see the cylindrical pieces sticking into the fasteners part way. When I push the fasteners into the hole does the pressure cause the cylindrical pieces to push in further?

Update:
I was told by a local Mustang shop that they believe you install the plastic clips into the square holes of the trunklid and then push the cylindrical tabs into the fasteners to mushroom out the tabs of the fasteners. Afterwards you simply snap the trim onto the plastic fasterners.

I tried one as suggested by the shop and the molding did not snap over the plastic fastener but instead kinda caved in. So I had to carefully re-straighten the flanges.

The two end brackets are pretty self explanatory, even for me!
 
Re: Trunk lid trim install fasteners -update

I've got a picture somewhere of the connectors, somewhere. IIRC, there are the barrel clips, the little small pieces that go into the holes in the trunk lid. After that, the clips themselves get slid onto the back of the trim piece, from either end where the opening is longer. Slide them where they line up with the holes in the decklid. Then push the clips into the barrel clips.
 
Re: Trunk lid trim install fasteners -update

So, I was thinking about this for the past three hours while I drive back from Oklahoma City and I realized what I was talking about in my initial reply was the trunk letters, they have the barrel nuts and the letters slide into them. I did have the same issue with the trunk trim piece. These are the pictures I posted when I asked how they worked (on the other site).

2_23_08_09_12_14_40_1.JPG


2_23_08_09_12_14_40_0.JPG


I never did get a reply that made sense, then I quit going back to check the thread. I ended up sliding the two corner mounting clips as they bolt on the inside of the trunk. I put them inside the trim where they needed to be. I then inserted the plastic clips in the holes in the trunk lid. The insert the round pins and tap them in to tighten the clips. I then started on one side of the trim and snapped the trim onto the clips. I tapped above and below the trim to avoid scratches, I also marked the tape so i would know where the clips were located.
 
Re: Trunk lid trim install fasteners -update

Rick,
I really appreciate your 2nd reply for your first one was driven me BeeZonkers which I'm already halfway there 24/7. When you tapped the trim into place, did you for instance hook the top of the inserts and then tapped the trim over the bottom edge (or visa versa)......or did you just put the trim evenly onto the insert and got out your BFH?

Again Mucho Gratzie.
 
Re: Trunk lid trim install fasteners -update

I really wish I could remember. I know I was puzzled with it for the longest time. I want to say that I hooked the top edge of the trim on the clip and then kinda rolled/tapped it down. You can see in the picture the clips are kinda beveled, so they should go on from top to bottom or vice versa.
 
Re: Trunk lid trim install fasteners -Installed !!!

Rick, no matter what the hot chicks say.....You're de man. First pic shows prior to trim installation. Yes I hooked the upper edge first and with a small block of wood taped I lightly tapped downward at each fastener and snap! Each one snapped into place.

4_23_08_09_5_02_50_0.JPG


4_23_08_09_5_02_50_1.JPG


and of course......Don't hate me Sluggo, its all in fun
4_23_08_09_5_02_51_2.JPG
 
Last edited by a moderator:
Funny... I did the exact same task this evening. I started by snapping in the center clip on the molding; then, worked my way out to each end.
It was a snap... bad pun intended :boo

It's amazing how much different the rear panel looks with the new & lettering back in place.

<><><><><><><><>

I also installed my differential catch/breather can.

23791070220_large.jpg
 
Last edited by a moderator:
Snapped a couple of pics when i got home tonight.

I installed the bumper in haste; I still need to adjust the alignment. However, I want to say the quality of this Dynacorn repro bumper SUCKS! I can see grind marks in the chrome, and the edge isn't even straight. I think i'm gonna look for a decent core, and have it rechromed.

31_25_08_09_12_01_51_2.jpg


31_25_08_09_12_01_51_1.jpg
 
Last edited by a moderator:
I agree, I thought my bumper was OK, then I wiped it down on Sun to get the dust off and there was all this stuff left on the bumper, I realized it was from the rag, there are a bunch of rough spots on the chrome that were grabbing the fibers in the rag......... :wtf
 
Michael,
Packy at Mustangs R Us always has nasty looking original bumpers which are great for cores. You then take it across the street to Superior Chroming. Not cheap, but the quality is unreal. Think I paid $225 for the chroming.
 
&quot;70_Fastback&quot; said:
That looks great Michael. Can't wait to see Shag like that also Craig!


This will have to do for now......

4_25_08_09_8_49_29.jpg
 
Last edited by a moderator:
&quot;Fast68back&quot; said:
Are your tailights blacked out?

Yep. I applied 5 coats model car window tint stuff and one coat of clear, but I probably should have only done 3 or 4 coats of tint. I think it looks great, but I may be pulled over by the CHP... plus it makes the rear lights pretty dark (i know, not the safest).

23791070157_large.jpg


Here's the progression...

no tint
23791070149_large.jpg


1 coat of tint
23791070150_large.jpg


2 coats of tint
23791070151_medium.jpg


4 coats of tint
23791070153_large.jpg


5 coats of tint w/clear - before & after (i think the clear added just a hint more darkness)
23791070155_large.jpg
 
but I may be pulled over by the CHP...

I'd be more concerned about some jackwad smacking into the rear of the car than a $25 fixit ticket.

I think the shading of the taillight lens looks great, just not that dark. Two or three coats of the tint probably would have given the desired effect and still have been bright enough to remain functional.
 
&quot;daveSanborn&quot; said:
I'd be more concerned about some jackwad smacking into the rear of the car than a $25 fixit ticket.

I think the shading of the taillight lens looks great, just not that dark. Two or three coats of the tint probably would have given the desired effect and still have been bright enough to remain functional.

I agree. I'll probably just buy another set of tail light lenses, and make another attempt with less coats of tint. Hell, tail light lenses are pretty cheap, but it's lower on my priority list right now.
 
&quot;daveSanborn&quot; said:
I'd be more concerned about some jackwad smacking into the rear of the car than a $25 fixit ticket.

I think the shading of the taillight lens looks great, just not that dark. Two or three coats of the tint probably would have given the desired effect and still have been bright enough to remain functional.

I AGREE WITH DAVE.............LIKE BLACKED OUT TAILLIGHTS BUT THINK ABOUT SAFETY. SAFETY FIRST.
 
TO CMAYNA !!

LOOKS VERY NICE !!!!!!

I DID INSTALL MY TRIM ON THE DECKLID TODAY AND YES iiiiiiii IT SNAPS RIGHT IN !!!!
 
Back
Top