• Hello there guest and Welcome to The #1 Classic Mustang forum!
    To gain full access you must Register. Registration is free and it takes only a few moments to complete.
    Already a member? Login here then!

Need to adjust valve lash - please tutor me

Tims65

Member
I need to adjust the valve lash on my 347. The engine has 1,000+ miles on it now, but it sounds like a sewing machine. It has Comp cams hydraulic roller lifters and the following Cam Specs:

Intake SAE - 281
Exhaust SAE - 285

Intake @.050 - 232
Exhaust @.050 - 236

Intake Lift - .566
Exhaust Lift - .571

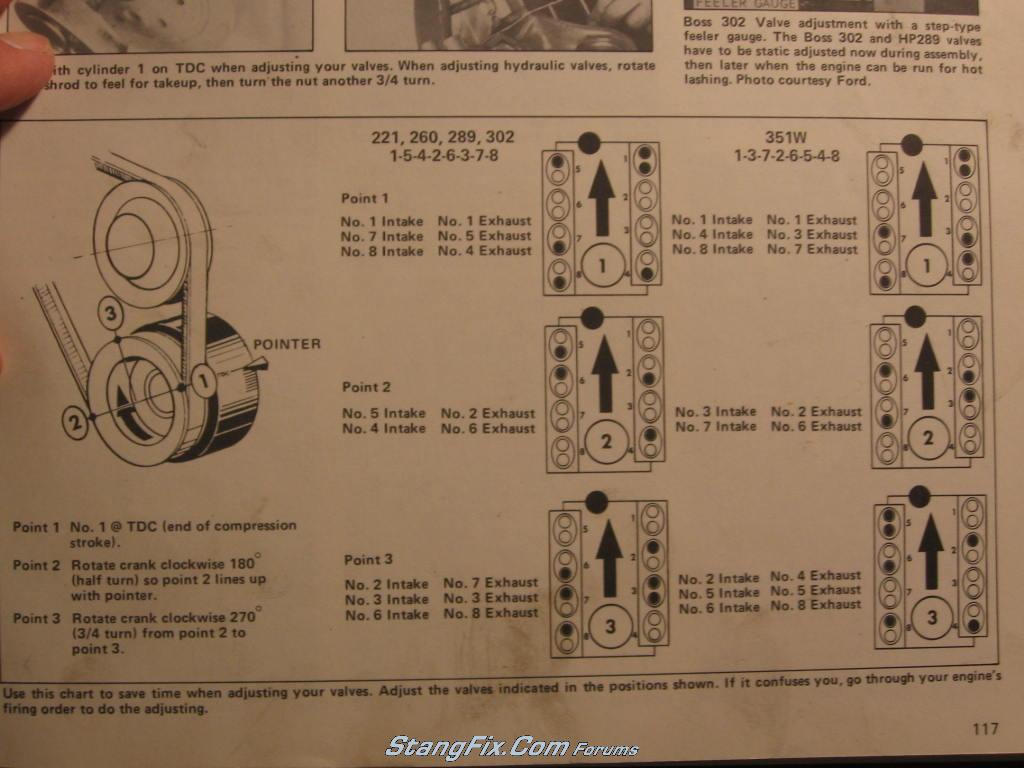
What is the proper method to adjust the valve lash for this application?
Is there a specific sequence to follow?
How do you rotate the engine?
Any tips/tricks are appreciated.

Thanks,
Tim
 
This can be tough to explain but I'll try. To adjust valve lash, you need to have the lifter on the opposite side of the camshaft lobe (often called the heel or base circle). The easiest way to explain is to use the method of exhaust opening and intake closing. Starting with the #1 cylinder, with the valve cover off, rotate the engine with a socket and ratchet on the crank bolt until the exhaust pushrod begins to move upward opening the valve. This means the piston is through with the power stroke and nearing BDC, and it's about to begin the exhaust stroke. At this point, the intake valve is closed and the lifter is on the "base circle" or heel of the camshaft. That's when you can adjust it. If the lifter is anywhere other than on the heal of the camshaft where there is NO ramp contact you will have incorrect lash. This position is required for each valve before you attempt to perform adjustments. The typical hydraulic lifter requires an adjustment that is roughly half the available travel of the plunger. If an average hydraulic lifter plunger has a range of 0.060" of travel from fully compressed to its static height with the pushrod seat against the retaining ring, half of that distance will be 0.030". This means that you adjust valves by the depth that the plunger in the lifter drops. If adjusted too tight (the plunger fully compressed) the valves do not close all the way, and if too loose the pushrod seat will rattle and do not open properly. To adjust lash with hydraulic lifters, with two fingers spinning the pushrod between them to feel for resistance you easily snug the adjustment nut. When you feel resistance STOP, now you will adjust the nut down "Only" 1/8-1/2 turn. To adjust the exhaust lash, turn the engine over until the exhaust valve has completed its lift cycle and the intake valve is closed about three-quarters of the way. Now, the exhaust lifter is on the "base circle" because the piston is finishing the intake stroke and about to begin compression. Set the lash on the exhaust valve and you're done. This needs to be done for each cylinder. You can do a method based on the firing order to adjust "companion" cylinders but if your new at this, I would stick to one at a time. You should do this with the engine warm, if it's cold you have to compensate for the expansion and it gets more complicated.
I hope this helps
 
Here's a chart that will help if you don't want to rotate the crank 16 times to get to the cam's lobe base. To turn the engine over manually, use a 15/16" (IIRC) socket on the crank damper and rotate it that way. It'll be a bit tough as you are fighting against the compression, to ease it up, remove a spark plug or two. Good luck.

202_15_09_10_7_52_19.JPG
 
Last edited by a moderator:
thanks for posting that, I didn't think I could explain that well enough. The pictures make it easy to understand. The only concern with doing it that way is that with aftermarket cams, it's hard to be sure at TDC both valves are actually closed. Some cams have valve overlap which means as the exhaust is closing, the intake is opening and so the lifters can be on the ramp. That's why I suggested doing the exhaust opening intake closing method and one at a time.
 
"tarafied1" said:
thanks for posting that, I didn't think I could explain that well enough. The pictures make it easy to understand. The only concern with doing it that way is that with aftermarket cams, it's hard to be sure at TDC both valves are actually closed. Some cams have valve overlap which means as the exhaust is closing, the intake is opening and so the lifters can be on the ramp. That's why I suggested doing the exhaust opening intake closing method and one at a time.


You are right on the money and explained it perfectly. The only way to know they are right is one valve at a time. I have never been able to get it right these days by using that chart, some pushrods end up so loose they will come flying out of their and that's not a good thing.
 
You can actually do it much quicker. I can get mine done in half an hour or so, and buttoned up and ready to go in about an hour.

Rather than trying to keep track of which cylinder you're working on, here's what I recommend:

Disconnect the coil wire and put the car in park/neutral. Get a good insulated screwdriver (or remote starter switch) and jump the B+ contact on the starter solenoid to the I terminal (small one on the left) until the exhaust opens and closes and then the intake opens and closes. Stop as soon as the intake closes, then give the starter another quick tap to make sure you're on the base of the cam. You've got almost a full crank revolution before the exhaust opens back up.

Adjust both rockers until there is no VERTICAL play in the pushrod. It's very easy to overtighten things when using the spin method. After you've removed all vertical play, turn the nuts in another 1/2 turn and lock them down.

Repeat for cylinder #2.

This method lets you do two at a time, and keeps you working on things in logical order. You just have to be extra sure you have the lifters on the base of the cam rather than on a lobe.
 
Ok, this is what Johnpro taught me. Might not be right but it has worked so far on Red. Get an old valve cover. Cut a big long oval hole big enough with the idea of having access to each rocker. Once hole is cut, I lined the oval hole with a opened up piece of bicycle inner tube and taped it to the outside of the cover. Slit the inner tube down the center lengthwise.

Get the motor warm. Put the modified valve cover on one side. Fire up the beast and starting from one end unloosen one valve at at time until you hear the clackity clack. Tighten up until the slop is gone. Then tighten up more 1/2 - 3/4 turn. That's it. Work your way down the row. Having the inner tube in place I get little if any oil shooting out. Very clean and quick.

Then switch over to the other side.
 
That works great if they have been adjusted once but don't try that on a fresh build.

opps I see he has a 1000 milese on it. It's always best to adjust them on a running engine If you can.
 
Back
Top