Aussie67
Well-Known Member
Gonna love this truck when it's finished. Keeping it or selling?
Follow along with the video below to see how to install our site as a web app on your home screen.
Note: This feature may not be available in some browsers.
Hello there guest and Welcome to The #1 Classic Mustang forum!
To gain full access you must Register. Registration is free and it takes only a few moments to complete.
Already a member? Login here then!
Oh, it's a keeper.Gonna love this truck when it's finished. Keeping it or selling?


I'm targeting about a 2-2.5" angle which would be a bit more than stock. I've made the new trans mount with that in mind as well. I think maybe I'll feature it next here. It is not just some fabbed up bar shooting straight across from one rail to the other, unfortunately. Situation and layout demands made the creation of that one fun.Nice !! Alot of work for an inch or 2 ?
An engine is mounted under a curtain angel ( tilted backwards a bit ) . Keep that in mind..as you probably know.
Good job !
I like what you did.Things sure are quiet around here...I mean the Fix in general. I've got a lot going on that's keeping me busy and away from the garage more than I'd like. Making good progress just not documenting a lot of it. Sorry. Things go together and come apart a lot on a build like this so I'll try and show more of the stuff I've been working on when it gets put back in place again.
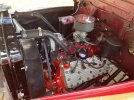
Still battling to get things situated the way I want. Main challenge remains stuffing that mountain of an engine under the stock hood. Anyway, here's a few pics of some custom engine mounts I made up. A good amount of effort to get just right for only gaining just over an inch of clearance. I like 'em. 3/16" cold rolled steel with a double gusset structure on the underside on either side of the bushing bore. She's a heavy motha, ya know!
View attachment 34466View attachment 34467View attachment 34468
The next couple pics show the "engine" in place with the new mounts compared to the original. You can see how much lower it drops. Notice how tight things get around the lower water pump inlets. There's just over 3/8" gap which is just enough for hose clearance and a little bit of "torque wobble".
View attachment 34469View attachment 34470

Life... more accurately, work, has gotten in the way. Been on the road for work at a crazy rate the last couple months. This weekend will be the first in a long time I should be able to sneak in some garage time. Only good news in this is that when I get stuck in hotels all week I tend to spend my nights scouring the Web for more parts. I've bought a lot of parts! lolAny update?
I’ve texted him this afternoon and no response. Just called and no answer, just his voicemail. Hmmm