• Hello there guest and Welcome to The #1 Classic Mustang forum!
    To gain full access you must Register. Registration is free and it takes only a few moments to complete.
    Already a member? Login here then!

my 66 restomod convertible

steveh326

Active Member
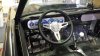
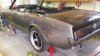
ok here's the start of my Mustang story for anyone who cares to read such things. not much to post for now, but just picked up the car from the painters yesterday and now the long job of putting it all back together starts. I have to admit I am a little intimidated by some of the work. I have worked on my cars and motorcycles my whole life but no job this big. I figure I have to view it as 1,000 small jobs not 1 giant one to put the car back together.

background, as brief as I can make it:
Dad brought this 66 gt convertible home in 1973. It was a basket even then. front corner crunched, rust EVERYWHERE. I never understood how a car so young had SO much rust in such a short amount of time. Anyway, he and I patched it up and put it back together as best we could with our abilities (i.e. sheetmetal, pop rivets (no welder back then), roofing tar and a gallon or so of bondo. We painted it in the driveway on a cool morning before the bugs were out. I added the GT rocker stripes using a rattle can of rustoleum (hey don't judge me...lol). I drove the car off and on for 20 years after that. the car finally got so rusted I was forced to take it off the road for fear it was going to break in half in the middle. it sat like that for 10+ years. I thought it was beyond saving but did not want to part with it. My father talked to a retired mechanic friend of his who agreed to take it in and work on it as he had time. Merle spent the next 6 years replacing just about every piece of metal on the car except for the vin tag. he worked miracles and was able to bring the car back to life. then... FIRE. Merle's shop caught on fire, the car did not burn but was badly singed/melted. it was an icy night, with more ice predicted, and the fire company was afraid of flareup and not being able to get back to the scene so they foamed everything in the shop to suppress more fire... BAD IDEA. the foam ate up every piece of chrome on the car, melted in to what paint was left, and caused oxidation on everything it touched. finally got all that cleaned up but it was a major setback. long story a little shorter, Merle and I finally got the car in shape to send to the painter. Painter said 2 months, actually took 8 months due to some issues. now the bad part... a month after I took the car to the painter, Merle passed away in his shop from a massive heart attack. I will miss him, he and I worked many long hours together and became good friends. I spent a day gathering up parts from Merle's and relocating everything to my fathers garage as he has more space than I do. Merle was extremely talented on everything automotive but was terribly disorganized. my parts were scatted between 2 buildings and a storage trailer. nothing labeled. I know I have all the big stuff but small parts like screws etc may be gone forever. One of my biggest regrets is that Merle did not live to see the car finished.

Due to the paint delays I debated several times about pulling the car from the shop and finding another painter for it, but in the end I decided to stick it out. Glad I did. I consider Dave a friend now and he does great work.

So now my journey begins to get it back together. My brother has a 66 convertible also, a survivor car, and he and I have been planning a father/brothers road trip for a couple years now. Hopefully 2015 will be the year.
 
Last edited:
You have an incredible amount of persistence when it comes to your car. I don't think too many would have seen it through to this point. Good for you!

Now as far as reassembly goes it is all down hill from here. No job is that tough really. Just take them one at a time and in a logical progression. What you don't want to do is what I do. Get a plan in place and stick to it. I tend to change my plans on every single thing each time the wind changes direction. That is what makes a project linger on and on. Reality is if one really wanted to they could put a car back together in days.

The more it comes together the more you will find the drive to finish it. Hard part is over. It's nothing but fun from here.
 
couple pics.

rust everywhere
IMG_8145.JPG

up on Merle's W. VA. rotisserie (4 55 gal drums and some 6x6s so we could get to everything)
frame paint 2.jpg

bolted the suspension on to make it a roller. front end is all TCP tubular stuff, roller spring perches, oversize sway bar, SSBC calipers, billet adjusters, etc. decided to go with the Borgeson steering, hopefully that won't be a mistake. rear springs are 4.5 mid eye's, I really want the car as low as possible. shocks are Edelbrock IAS on all 4 corners. I rebuilt the rear end with all new seals/bearings/brakes/etc... at some point after the car is together and my wallet recovers I will add posi unit and the SSBC disk brakes to the rear.
Mustang 4.jpg

mocked up
14.jpg

After I dropped the car off at the painters, I took the opportunity to freshen up the 289. My plans call for a stroker for it but I need to run the 289 for a year or 2 until my budget recovers then I'll do the motor. I made sure everything I got for this motor will transfer to the new one cause I didn't want to waste the $$ on throwaway stuff. the c. rate 289 that was in the car only had a few miles on it and was running fine when I took the car off the road so it should be OK for another year or 2. I guess this is called 'perfuming the pig'...lol.
before
22.JPG
after
24.JPG

I also took the opportunity to wire up my new gauge cluster with my autometer cobalt gauges
28.JPG 29.JPG 31.JPG

the seats are upholstered in TMI pony sport seat upholstery and I added the headrests. no pics of those for some reason. EDIT found a pic of the seats
33.jpg

car when I picked it up yesterday. everyone loves the color combo, but the flames are controversial, half the people like them the other half hate them but I like them and glad they are on there as it makes the car mine. I have included flames of some sort on every car/motorcycle I have ever built so I kinda had to work them into this paint job somehow. wife was on the fence from the pictures but after she saw it in person last night she likes them too so I guess that's all that matters. colors are ford mineral gray sides, horizontals are gm carbon black metallic, and the stripe is a Nissan burnt orange metallic. I wanted the hood/trunk to flow with the black conv top and black interior. in my head it all looks good but won't know for sure until it's all back together... some chrome on the car but not a lot. bumpers are painted
P51.jpg P52.jpg P53.jpg


anyways thanks for hanging with me this far. hopefully will have more updates soon. and thanks to all the knowledge and support from this forum community.
 
Last edited:
That's a very pretty "pig"!

I hope it fits under the hood. You may need to go to a drop base air cleaner. It looks awfully tall in the pic.
 
Looking great so far. Can't wait to see it all come together.


Sent from my XT1058 using Tapatalk
 
yeah really tall. In the pic it's got a 1" carb spacer that I have since pulled off. it'll fit fine now especially with the cowl hood. I am most concerned about headers... really want long tubes but not sure what will clear with the borgeson box. I have a rusty old set of try y's plus these new shorty's to try but I'm still drooling over the jba long tubes. I finally ordered my T5 on Tuesday so once it gets here will drop it all in and see how it all fits together.

in the meantime I plan to install the dynomat (well, Eastwood's cheaper clone) and get started o the wiring.
 
Really would like to hear about the headers and the Borgeson. Haven't bought mine yet (won't need them until next summer) and happy to hear form another on fit, etc. Since I'm going T5 too you are the perfect guinea pig :).
 
Really would like to hear about the headers and the Borgeson. Haven't bought mine yet (won't need them until next summer) and happy to hear form another on fit, etc. Since I'm going T5 too you are the perfect guinea pig :).
I just got off the phone with Dustin at JBA. I figured I would at least ask them if they knew. He says their 6613S headers will work with the 289/borgeson/t5 combo... he made my day. they're listed for 351w so they didn't come up in my search but sposed to work.
 
Doesn't everyone use their dining room table for car and motorcycle parts? thank god my wife puts up with my crap. I was a gearhead when she married me 36 years ago and she knew what she was getting into.

I debated for a while but I ended up sandblasting the chrome off my gt fog light bar and painting it black for something different. the chrome was in pretty bad shape anyway so it was no great loss. fog lights are led as will be all the lighting on the car.
34.jpg
 
Isn't that what tables are for? We eat in the living room. Our kitchen table mostly collects junk.

Sent from my XT1058 using Tapatalk
 
been a while. small update on here but a huge step for me. the car moved under it's own power to drive up on the trailer for trip to alignment shop. front end alignment done. mechanic said alignment went well due to the adjustable front suspension parts. said he felt a slight binding in the steering box (borgenson)... hope that turns out to be not a big deal. steering boxes are like torque converters to me... all voodoo under the covers. from the alignment shop it will head to the muffler shop... I got a magnaflow system for it but it's going to need some mods to fit the headers and exit thru the gt rear valance plus it's a convertible and some mods for that also.

also my carb was trashed, rather than rebuild, I ended up going with a FItech efi on it. so far it seems to start/idle/run pretty good but needs to be driven for self-learning. love how clean and compact the whole unit is.

I have lost all track of time, but my guess is that it's been 10+ years since my car moved under it's own power and didn't have to be pushed/pulled/dragged where it was going. still needs a ton of work to be roadworthy, but running/steering/stopping is a huge step and hoping I might have it done by early spring. Left to do: complete interior, front end, and convertible top.
 
Last edited:
Doesn't everyone use their dining room table for car and motorcycle parts? thank god my wife puts up with my crap. I was a gearhead when she married me 36 years ago and she knew what she was getting into.

I debated for a while but I ended up sandblasting the chrome off my gt fog light bar and painting it black for something different. the chrome was in pretty bad shape anyway so it was no great loss. fog lights are led as will be all the lighting on the car.
View attachment 25205
I used to rebuild carbs on our table.

My wife reminds me of the large size of the garage all the time.

Sent from my XT1030 using Tapatalk
 
exhaust done, front end together, most of the wiring done but a few electrical glitches to resolve. still some work to do but light at the end of the tunnel.
 

Attachments

  • 20170325_120913.jpg
    20170325_120913.jpg
    193.5 KB · Views: 23
  • 20170325_174827.jpg
    20170325_174827.jpg
    234.5 KB · Views: 24
  • 20170325_120954.jpg
    20170325_120954.jpg
    250.5 KB · Views: 23
Hey @Steve326 how are you and your '66 mustang doing? I'm building a '68 coupe right now and am hoping you can shed some light on how your JBA 6613S headers worked for you? I know the dimensions are different for a '68 vs your '66, but I think your application is tighter than mine?

I'm getting close to stabbing my roller 302 with Trick Flow TW heads, T5z manual and Borgeson ps conversion, and I'd like a ceramic long tube header that wouldn't need to be hammered to fit. I've got stock shock towers, stock engine mounts, MDL cable clutch (hydro if needed) and will have a/c before summer. Canton 8 qt RR pan with pass side pan mount oil dipstick....
 
sorry Fishfreq, I did not mean to ignore you. I have not been back to this thread for a while and did not see your post. I ended up going with a set of ceramic tri-Y's instead. I read something about the JBAs hanging down on a 289 vs 351 on a 65/66 and since my car is lowered I was worried about ground clearance.

some updates... al the electrical gremlins sorted out and everything working. Got the power top working again. I did not like the headlight/fog lights I got initially so I changed them out to something a little different, Harley Daymaker LEDs for both. the headlights dropped right in but the fog lamps were a b*** to adapt to work, but I think the effort was worth it I love the look now. ties in well with the blacked out front end I think. I need to tidy up the wiring hanging down under the dash then I should be ready to install the interior... check that, I need to drill the holes to mount the the 3 point seat belts installed before the back panels go in. then it's off to the upholstery shop for new top.

I HATE how loud the frame mounted fuel pump is for my Fitech setup.. I see they now offer an in-tank pump that I can retrofit to my new tank... so now THAT is on the list as soon as I can figure how to drill a hole in a tank that has had gas in it without blowing myself up.

it's the stupid little things that give me a headache sometimes... like getting the cables routed for the parking brake... started with the wrong trans crossmember that did not have provision for the lever... got that sorted out. since my sheetmetal is all new, all the points of reference are missing. I was able to look under my brothers mustang and took some pics of how everything was routed and where it goes I just need to get under my car and get it sorted out.

I am debating heading to the MVA to get the tags for it, but this is my busy season and I am back to working 7 days a week for a while so the remaining work still might take me a good while.
 
Back
Top