• Hello there guest and Welcome to The #1 Classic Mustang forum!
    To gain full access you must Register. Registration is free and it takes only a few moments to complete.
    Already a member? Login here then!

A kind of "what I've been up to and will be up to for a while" build thread...

70_Fastback

Hell Bent for Speed
With over whelming enquiries and requests, I have decided to document my current build here - even though it's not a mustang... :oops:

The following will document the progress, so far, and future progress.

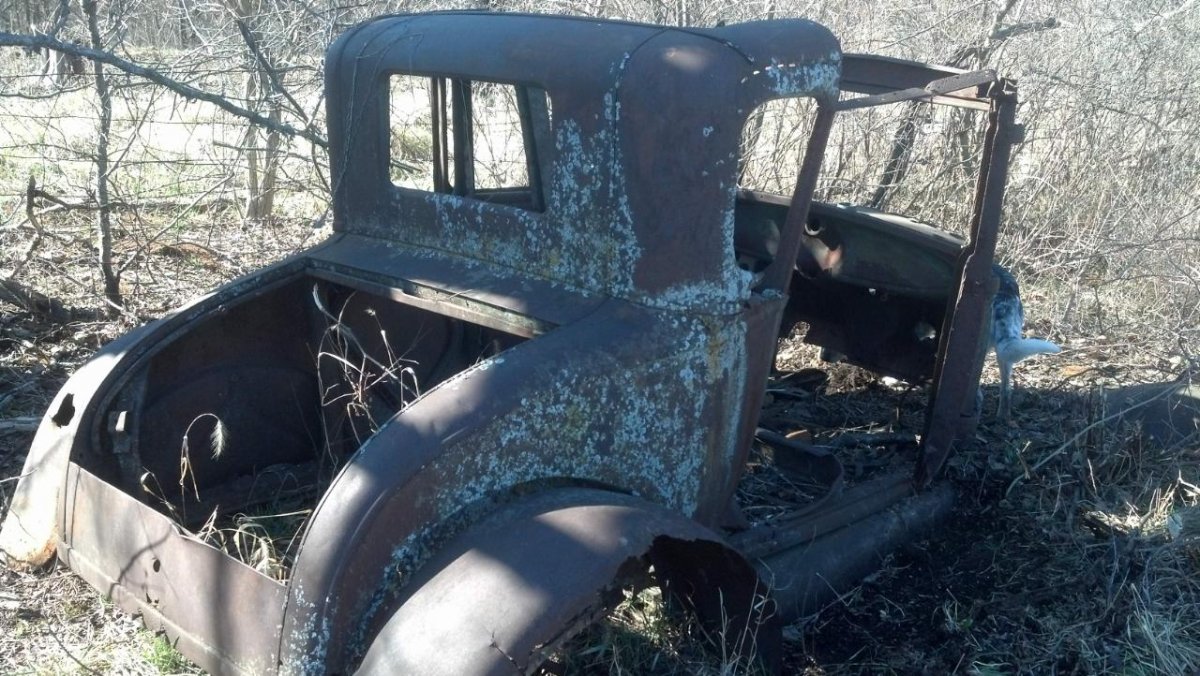
The car is a 1928 Ford, 5-window, Model A, standard coupe that I acquired for free.
My Father-in-law came across this body while deer hunting on his buddies property, that he just bought. His friend said that I am more then welcome to get it, or it's going to the scrapper. These are the picture that my FIL text messaged me:

photo-jpg.2969487


photo1-jpg.2969488


What you DON'T see in those pictures is the entire frame, with some brackets, etc, still buried in the ground. Needless to say, I came unprepared. To dig that is...

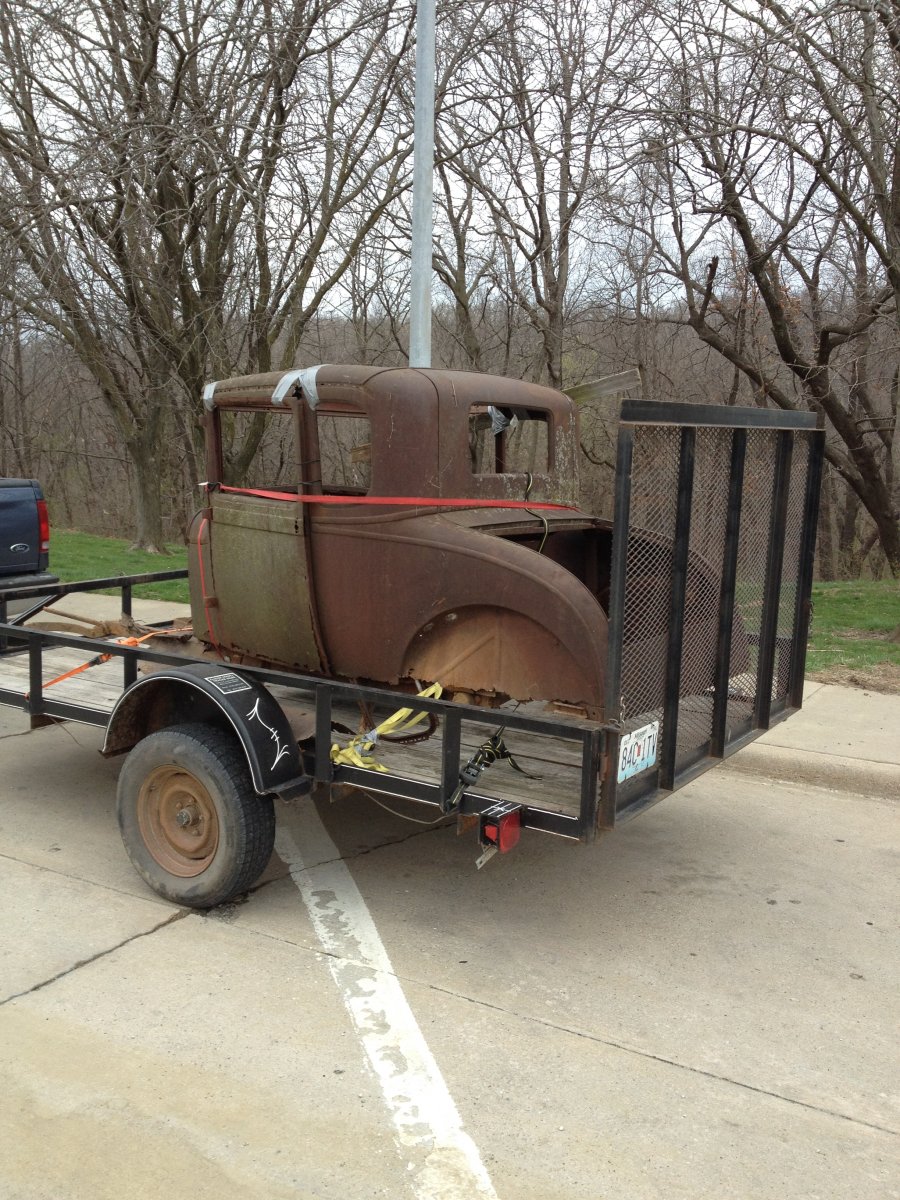
But I wasn't leaving without the coupe! We luckily found an old broken shovel in a nearby barn and was able to dig it free and eventually pull it out with the truck.

This is after we had it loaded and was on our way home:
img_0176-jpg.2969494


img_0177-jpg.2969495


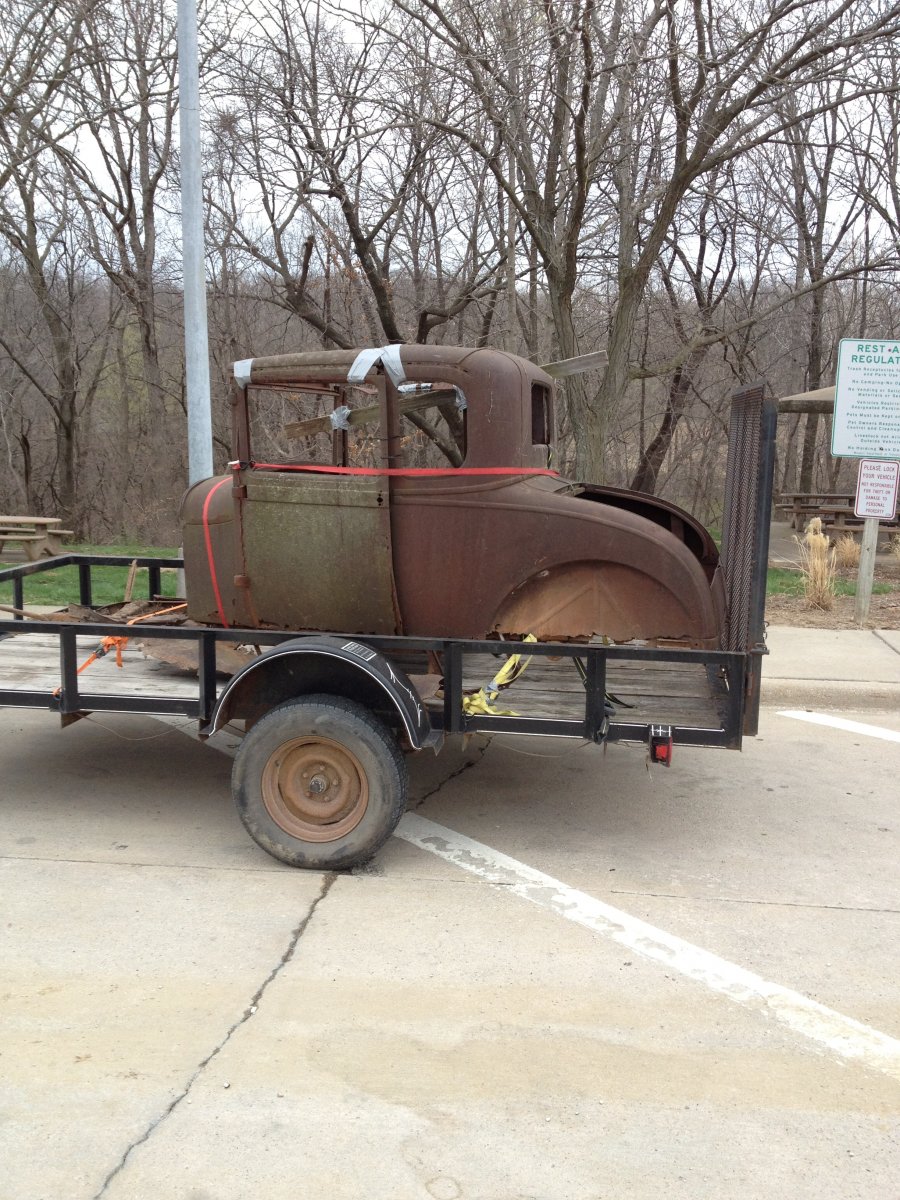
This was back in March of 2012. I got it home and it then sat for about 2-1/2 years while I finished up home projects, etc.
 
Fast forward a couple of years. Got the coupe into the shop and actually cleaned it up some to get a better feel of the condition. Cleaning it up helped visual matters a lot:

img_0081-jpg.2969496


img_0084-jpg.2969497


img_0085-jpg.2969498


img_0086-jpg.2969499


img_0087-jpg.2969500


img_0096-jpg.2969501


Over all, it was pretty solid, with the Right hand side being the worst off. But it's coming totally apart anyway to fix rust issues at the seams, etc.
 
The moving forward plan is pretty simple... I'm using ASC '32 Ford rails - that will be fully boxed with a blown 331 Hemi.

Starting off with jigging these rails:
img_0102-jpg.2969503


img_0103-jpg.2969504
 
Deconstruction of the body continued... Found some more rusty issues, etc. A few stress cracks. Nothing that can't be fixed...
img_0338-jpg.2969505


img_0339-jpg.2969506


img_0340-jpg.2969507


img_0345-jpg.2969508


img_0348-jpg.2969509


img_0356-jpg.2969510


I tend to get busy and "forget" to document steps... The entire body is taken apart, down to the individual panels that I will take and sandblast at some point.

The next point was to make a subrail jig based off of this original one. This one is too far gone to repair when I can buy new subrail sections and build my own new subrails.
 
After the body was off, I squared the old sub-rails up the best I could and fashioned a small jig table with appropriate jig markers, etc. I tried to verify original subrail dimensions from the internet, etc and didn't have a bunch of luck though. So I forged ahead with my own taken measurements.

New rails are layed into place and clamped tight to draw them out:
img_0531-jpg.2969513


Checking fitment with the stock Cowl/A pillar dimensions. It lined up really well:
img_0533-jpg.2969514


img_0535-jpg.2969515


Seems like a nice, correct, fit.
img_0536-jpg.2969516


Surprisingly, the new rear cross member seemed to fit spot on as well.
img_0540-jpg.2969517


img_0541-jpg.2969518
 
Really cool build. Definitely keep us posted.

Living the dream or running it down... Haven't figured out which yet.
 
Installing the cross braces was a little more tedious that I thought. I fab'd the cross braces and attachment points exactly like Ford did on the originals...

Which involved pie cutting, stair stepping and rewelding the cross rails to follow the contours of the subrail stampings.
img_0562-jpg.2969528


img_0566-jpg.2969529


I elected to not do hand bucked rivets, but rosette welded to "resemble" rivets. When it's painted you will never know the difference. The subrails did get welded on the bottoms too for added strength.
img_0572-jpg.2969531


img_0571-jpg.2969530


Check for squareness..... check!
img_0585-jpg.2969532
'


And for shits-n-giggles, I overlaid the orginal subrails to compare the two - to check my work and the accuracy of the repo rails...
img_0578-jpg.2969533


img_0579-jpg.2969534


img_0582-jpg.2969535


img_0583-jpg.2969536


img_0584-jpg.2969537


And the (temporarily) finished subrails:
img_0590-jpg.2969538


img_0591-jpg.2969539
 
Which leads me to this point...

For those that don't know, there are issues with fitting '28/'29 bodies to '32 rails... They don't just "fit". The subrails need to be modified. LUCKILY I have a brand new, solid subrail starting point... to cut up. Ugh.

Granted this is just chucked up there, you can easily see the issues... model A's are flat... '32's... not so much.
img_1300-jpg.2969558


img_1301-jpg.2969559
 
Last edited:
After lots, and lots of research on how other people where fitting these, I came up, with what appears, to be an ORIGINAL idea on how to fit the subrails to the frame rails...

Quick under view shot showing the spacing:
img_1733-jpg.2969562


img_1734-jpg.2969563


So, I decided to just rejig the back rails and re-angle them to fit, up, INSIDE, of the subrails. Almost like a "channel" job.

But in order to get the body to drop down, first I had to bob the frame rails off on the rear roughly 16":
img_1737-jpg.2969564


img_1738-jpg.2969565


Next up was pie cutting and re-angling and welding up the rear of the rails to not swoop out so much.
img_1739-jpg.2969567


You can see the outward swoop. these needed to be straight and parallel with the rear subrails:
img_1740-jpg.2969568


Rear rail corrected and finished. I also added a small relief step to allow the subrail to sit down flat on the rails. Keep in mind these rails will be fully boxed as well.
img_1741-jpg.2969569


img_1742-jpg.2969570


Both sides are stepped: (hey, look - there is my model A body... on the floor!)
img_1744-jpg.2969572


Now that the frame is ready to receive the subrails, the subs needed to be sliced and diced...
Basically I cut open the entire top of the rear rails like a tin can to allow them to drop over the frame rails
img_1745-jpg.2969575


img_1746-jpg.2969576


Here the subrail is "test" fitted to the frame:
img_1749-jpg.2969577


img_1750-jpg.2969578


And it fits.

Quick view of the step area showing the subrail fitting:
img_1757-jpg.2969579


This inside portion will require a but more fab work to curve up and maintain the same drop lip.
img_1758-jpg.2969580


Then came the fun part of reinforcing the rear subrail sections. The outside part was easy.
img_1759-jpg.2969600


img_1760-jpg.2969601


img_1766-jpg.2969602
 
Man, finally, between work and home crap, I get some time to wrap up the subrails. I had to finish the inside yet for the channeled area.

First step was to make the new inner floor structure lip. I decided to try my hand at hammer forming on a wooden buck to form the new piece:
imageuploadedbyh-a-m-b-1445745625-996174-jpg.3038689


imageuploadedbyh-a-m-b-1445745656-032502-jpg.3038690


imageuploadedbyh-a-m-b-1445745684-821380-jpg.3038691


First pass at the roughed out piece:
imageuploadedbyh-a-m-b-1445745747-408267-jpg.3038692


It actually turned out pretty damn good. Initial fit up was close, just needed a little tweaking and some trimming after the stretching.
imageuploadedbyh-a-m-b-1445745824-825266-jpg.3038694


As a refresher, this is what I'm altering:
imageuploadedbyh-a-m-b-1445745906-042311-jpg.3038695


Skip ahead a few hours and no pictures later...

Both sides are basically done. I didn't have any fine discs to metal finish it, so that will be later this week.

imageuploadedbyh-a-m-b-1445746156-533551-jpg.3038698


imageuploadedbyh-a-m-b-1445746190-979535-jpg.3038699


imageuploadedbyh-a-m-b-1445746234-298295-jpg.3038700


And to illustrate the kick up from a traditional model A subrail - which is totally flat:
imageuploadedbyh-a-m-b-1445746323-465086-jpg.3038702


imageuploadedbyh-a-m-b-1445746363-049444-jpg.3038705


imageuploadedbyh-a-m-b-1445746363-049444-jpg.3038705
 
See, now that's what the F*** I'm talking about. Love to see the detailed craftsmanship of your "hobby" work. Like Mikey said, you got some skilz!
 
Holy crap J! Tell us...really...who's doing all the metal work. No way you're doing that ;)

Remember, it is Bonnie doing all of that meticulous work. I just sit back, drink beer and watch her work. And when I get hungry I will stop her and have her go make me a sammich and then get back to work. I fully recognize that she needs the occasional break also.


Sent from my iPhone using Tapatalk
 
Awesome work! When did you get idea that this sort of build didn't want to be seen here??? Keep posting.
 
Back
Top