• Hello there guest and Welcome to The #1 Classic Mustang forum!
    To gain full access you must Register. Registration is free and it takes only a few moments to complete.
    Already a member? Login here then!

351W and test stand

B67FSTB

The NorCal dude from Belgium
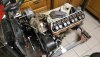
I recently bought an 351W engine from someone who has a 69 cougar XR7.
I was some kind of cheap depends on how you approch such a buy.
I needed an engine for my 67 fastback which I bought in Germany.The car was totaled but I see potential in that car because its restorable.
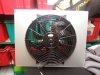
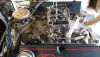
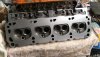
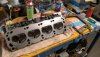
I didn't hear the engine running but removed the valve covers and it is clean.
Some exhaust valves were black/wet from oil dripping through the valve guide I presume.
Later at my place , I noticed that the RH head gasket was mounted falsely. Tab of the gasket was visible at the rear of the engine instead of the front side.Also the exhaust valve of cyl 4 was kind of white/yellow which indicates heat , I guess.
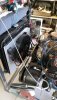
So I am planning to test run the engine first.
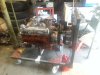
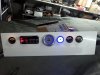
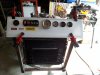
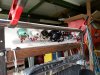
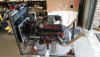
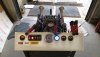
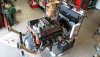
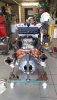
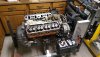
Because I am on a budget , I scrap everything together what I had laying around at my place.
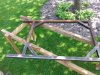
I have alot of square tubbing 1 1/2 laying around to make a chassis for the test stand.
Some things were bought new , 2 of the 4 wheels , some nut and bolts , some sheetmetal.
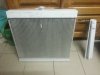
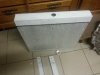
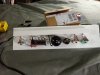
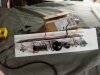
I had a alu radiator net so I bought some alu sheetmetal and let it bent into a U-shape profile.
After some cutting and bending I made the upper and lower collector of the rad which will be mounted on the test stand.
Here are the pics. BTW I got my inspiration on YouTube channel. Thanks to those guys !!
 

Attachments

  • 20180518_150305.jpg
    20180518_150305.jpg
    500.6 KB · Views: 49
  • 20180529_094343.jpg
    20180529_094343.jpg
    325.7 KB · Views: 50
  • 20180529_094506.jpg
    20180529_094506.jpg
    298.3 KB · Views: 51
  • 20180529_094633.jpg
    20180529_094633.jpg
    257.1 KB · Views: 49
  • 20180529_094701.jpg
    20180529_094701.jpg
    318.7 KB · Views: 49
Nice build, I was thinking of making one out of lumber and using the old radiator, etc. for the new engine break-in, then disassemble the kludge to get it out of the way. You've got a valuable piece of equipment there.
 
Nice job! Looks well built. I would advise including a rear mounting fixture for the engine too. Even just a single strut welded to the frame that has a tab to bolt into a bellhousing location, for example. Would make it much more stable when running.
 
Nice job. Once I no longer needed my body cart I cut it up and built a test stand too. Now that my engine is back in the car a friend borrowed it to test a 302 for his 66.
5a07e6d784bf0badc5c4fd10fb972d24.jpg


d410b901e443c6985d3979e1cf10e73f.jpg


Sent from my iPhone using Tapatalk
 
Looks good, you did a really good job on it.

_____________________________
Never argue with a Moron. They'll just drag you down to their level and beat you with experience.

If the women don't find you handsome, they should at least find you handy.
 
Nice job! Looks well built. I would advise including a rear mounting fixture for the engine too. Even just a single strut welded to the frame that has a tab to bolt into a bellhousing location, for example. Would make it much more stable when running.
Thx guys !
Yep , I know. Project isn't finished yet. Looking for a nice construction strut set up. ( so I can show of!!).
BTW , right now the engine has a good front/rear balance.
Right now I am waiting for some alu tubes to finishe the rad.
Also still busy to look for electrical parts , like wires , relays ect.
 
some more pics
 

Attachments

  • 20180602_141902.jpg
    20180602_141902.jpg
    326.8 KB · Views: 37
  • 20180605_165212.jpg
    20180605_165212.jpg
    239.6 KB · Views: 36
  • 20180605_165234.jpg
    20180605_165234.jpg
    289.4 KB · Views: 35
  • 20180602_141607.jpg
    20180602_141607.jpg
    363.1 KB · Views: 28
  • 20180602_141512.jpg
    20180602_141512.jpg
    424.1 KB · Views: 28
Made the shroud and mounted the fan.
 

Attachments

  • 20180615_120442.jpg
    20180615_120442.jpg
    302.8 KB · Views: 29
  • 20180615_120452.jpg
    20180615_120452.jpg
    261.4 KB · Views: 28
You should drill holes in the sheet aluminum outside of the fan to get more air flow
If mounted in a car those holes you see in some shroud set-ups are to prevent excess pressure build-up in extreme cases. For this purpose, they are not needed. The fan is the only thing causing air movement.
 
If mounted in a car those holes you see in some shroud set-ups are to prevent excess pressure build-up in extreme cases. For this purpose, they are not needed. The fan is the only thing causing air movement.

Correct. In cars they usually have flaps so when pressure built (due to excessive driving) the flaps will open and when the fan kick in , the underpressure ( between rad and shroud) will close the flaps and cooling is forced by the fan.

Yesterday i got my hedman headers. Nothing special , plain painted iron headers.
I also used a 64-66 battery tray , drilled out the spotwelds from the support , mounted it on the frame.
Pics will follow.
 
Yesterday , I got the time and took the engine out to try it getting running. After a few turns , it fired right up but did smoke ALOT !!
Dispite all spark plugs were loose in the heads !!
I noticed that fuel was poring into the carb so I open the top of the carb and noticed a damaged floater. See other thread .
I dissembled the metering rods and jets , fuel inlet needles and seats and put them in a ultrasonic bath.
Need to wait for a new floater.
 

Attachments

  • thumbnail_20190925_113028.jpg
    thumbnail_20190925_113028.jpg
    205.1 KB · Views: 17
  • thumbnail_20190925_113058.jpg
    thumbnail_20190925_113058.jpg
    209.4 KB · Views: 17
  • thumbnail_20190925_113118.jpg
    thumbnail_20190925_113118.jpg
    233.8 KB · Views: 18
  • thumbnail_20190925_113128.jpg
    thumbnail_20190925_113128.jpg
    206 KB · Views: 16
  • thumbnail_20190925_113156.jpg
    thumbnail_20190925_113156.jpg
    227.9 KB · Views: 17
So, after rebuilding the carb , I got the engine running but because the cooling system wasn't hooked up ( due to hoses are to short ) I couldn't tune the engine.
I did know the head gasket of the RH cylinder head was mounted the wrong way ,so I decided to dissamble the heads and put in new head gaskets.
I noticed that cyl 1,2,3 and 5,6,7 were all wet/greasy. Looks to me that the valve stem seals are shot but also have to check valve stem guides.
Time to clean and check things. Pics will follow.
 
UPDATE :

So I dissambled the heads and ordered some parts ( thx Mike ) .
Brought everything to my enginebuilder. Heads were cleaned , pressure tested , hardened seats , k-line valve guides, valves were grinded (oil burns pockets on exh valves) and resurfacing.
I did lapping all valves before installing.
I noticed that some springs had a damper inside and forgot on which valves they go. Now there is a guy who is mainly on facebook and that is Ken of Ellison engine shop. http://ellisonsmachineshop.com/ or https://www.facebook.com/pages/category/Machine-Shop/Ellisons-Machine-Shop-157130251058147/
Although I haven't bought any parts from him nor used his services , he seems to be a stand-up-guy. When you ask this man a question , he will answer you although he doesn't promise you that ! I sent him a message about my 351W which had 8 springs with damper and 8 without and the fact I did know where they go. Next day I got an answer which was : "To my knowledge both springs should have dampeners. I personally would put them on the intakes because the intakes are most prone to burning oiling and the dampener helps to shroud the valve stem from oil splash. Honestly I don’t know it there is a correct answer. I really don’t think they are a factory matching set of springs. " . He also sent me the specs of the springs i should have. Helped me alot. So thank you Ken !!

some pics :
 

Attachments

  • thumbnail_20200318_164047.jpg
    thumbnail_20200318_164047.jpg
    194.1 KB · Views: 12
  • thumbnail_20200403_105932.jpg
    thumbnail_20200403_105932.jpg
    221 KB · Views: 14
  • thumbnail_20200403_110338.jpg
    thumbnail_20200403_110338.jpg
    228.6 KB · Views: 15
  • thumbnail_20200403_111407.jpg
    thumbnail_20200403_111407.jpg
    226 KB · Views: 16
Back
Top