• Hello there guest and Welcome to The #1 Classic Mustang forum!
    To gain full access you must Register. Registration is free and it takes only a few moments to complete.
    Already a member? Login here then!

1952 F1: The Garage Roommate

Select from the following six options, derived from two basic designs w/ colors and options.

  • A

    Votes: 1 7.7%
  • B

    Votes: 7 53.8%
  • C

    Votes: 2 15.4%
  • D

    Votes: 0 0.0%
  • E

    Votes: 3 23.1%
  • F

    Votes: 0 0.0%

  • Total voters
    13
  • Poll closed .
Despite your many prayers, I am not dead. Not yet anyway. Didn't mean to go AWOL. As Mark wrote, things went south around here. Not going to share all the grisly details but I will say like a few others here I have an aging parent that has required some attention on top of some other unforeseen and unwelcome life stuff. Whatever. We all have to deal with it, right?
 
I know. I know. Life is still too freaking hectic these days. I had planned to do a huge update on all the work I had managed to squeeze in since the start of summer but I want to do it justice and simply don't have the time right now. I can give you a quick written update and some teaser pics. I don't have many as I tend to get going with the work and forget to snap 'em! I plan to take the week after next off so if not before then surely at some point during that stretch I will add more here.

My main focus has been the interior of the cab. So much modification going on there. The dash area is almost done. All metal. Hand formed. Long learning curves there but well worth the time, effort and expense (tools). Not sharing pics of that until I can do a bit more refining and detail work. Portions are destined for paint, wrapping in material and there may be an amount of Brazillian Rosewood in there too along with custom made polished and chromed trim. Worth the wait. Promise. Had to one up the mustang interior/console build.

Doors have had some of my limited time as well. The old latching system is simply not safe. The doors on all Fords this old or older are known for popping open on their own. So one project is to modify the doors and cab pillars to integrate modern dual catch, bear claw style latches. Included in this change will be all newly engineered inner and outer latch mechanisms and power locking function. Thisclose to also going to a Kindig style flush outer handle. Work is currently paused as I make this decision.

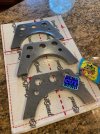
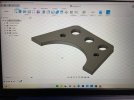
Another big undertaking has been the rear half of the frame and suspension. Remember, this is a full air-ride set-up. The four link has all been designed and welded in. The frame required a c-notch to obtain the range of motion I wanted. The real challenge there was I didn't want to have to raise the bed floor much if any. That took some real planning but I like where I ended up. A plasma table is in my future but I simply do not have the space now. So I found a company called SendCutSend that will take your engineered drawings and cut parts for you. Quick and cheap. I used Fusion 360 to design what I needed, sent the file and in less than a week had the parts in hand. Laser cut. Awesome.

68572448893__53367F03-BD2D-4D45-94E8-5F70CC999198.jpgIMG_1524.jpg
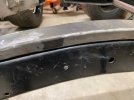
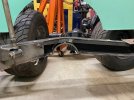
The notch left me with just 1.25" in frame rail height at the shortest point. Even though the full suspension aside from the air over shocks mounted in front of the notch, that little rail would not do the job. So I had notch plates made in 3/8" thick steel. I used a section of 1/4" thick 6" pipe, 3/16" steel boxing plate and some 1/8" wall 1x2 steel tubing I had on hand to basically build an overkill notch set-up.

Here are some pics of it coming together.
IMG_1528.jpgIMG_1529.jpgIMG_1527.jpg
I don't have pics of it all finished but I put a section of the 1x2 contoured to match the top of the rail inside and plug welded it to the top of the rail as well as the boxing plates that cover it on the inside. The half section of pipe is also fully welded inside the rail and out. Then a pair of the notch plates I had cut sandwich it all on either side and got fully welded in. The top of the plates stand 1 3/16" proud of the top of the stock rail. Another piece of the 1x2 tubing was cut to fill that void and the a piece of 3/16" plate was welded over the top of it all to close it all up. A LOT OF WELDING. A LOT OF STEEL. It is way more than needed but it does the job and looks good doing it.

Anyway. Not really much to look at but hey, it's an update. I'll be back with lots more soon. Promise.
 
It's a funny thing that most of the hard work is in the areas the are not seen. Looking good
Always the truth except this time. Kind of. Like I did with the front framework, I will be dressing out all the welds to smooth them into the rails, etc. Reason being you will see all this. The bed floor will mount on electric actuators to open up. Thats how I will fill the tank but also allow it to show off all the polished tanks, air pumps, stainless steel air lines, the 4 link and everything else. I can't do anything the easy way.
 
There will be quite a lot coming very soon on the truck. Managed to find opportunities over the holidays to get into the garage. Sorry to keep disappearing from this thread like I do. It's about to get busy here!
 
Finally back at it in the garage. At an important juncture in the build and am looking for opinions. Even {.}'s. I have been primarily focuses on the chassis with most of the little time I have had the last few months. I am at the point I have to either make a drastic move or forget the idea forever. Here's the deal. ILOVE the front end of the truck. I like the 3/4 profile. I HATE the dead on side view. Two issues in my mind. It's too long and makes the tiny cab look funny. Second, the rear fenders are too simple.
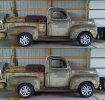
My solution? Shorten the truck. Cut the frame and section out a big chunk of the bed length before the fender. Once that's done, if I still feel the need I will rework the fender shape so that last third or so slopes down a tad instead of being so level. The big question for the day (and the readers), do I shorten it up? See pics below
F1shorteedone.jpg
 
Terry. I would leave it as it is. When shortening the wheelbase , those fenders front and rear will take/draw more attention. Altering the rear fenders alone is risky cause the design could fight with the design of front ones . And a short wheelbase is less comfortable to drive. My 2 eurocent.

Verstuurd vanaf mijn SM-A605FN met Tapatalk
 
I like the shortened bed length look. The other thing to consider is to drop the bed rails. One thing Ford did wrong on all of their step side trucks was that ugly bedside above the fender. Chevy did a much better job in that arena
 
Surgery has begun but will have to wait until tomorrow to finish up. Dinner plans with the wifey tonight. I've got a number of things flying about in my head that will be part of this process. I don't see lowering the bedsides though. the bed floor is already coming up more than I wanted/like and to shorted the side height would only compound it. I can address the aesthetics of them other ways, I think. Same with the running boards when I start to hack them up as well.

It's funny, on the mustang I didn't touch anything on the body. Mainly because in my eyes the 65/66 fastback is just about perfect as they made 'em. On the F1 there will not be a body panel that hasn't been altered and that includes the cab, doors, bed...all of it. Some more than others but everything is getting some tweaks.
 
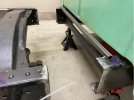
As usual I didn't get as much time as I would have liked in the garage today. Something about the wife having a birthday interrupting my plans. :p I did manage to get the bed taken apart and the frame cut and sectioned. Can't believe how much easier it is to work on it now that the bed is off. Spent the last year sliding in and out from under the damn thing sitting at ride height!
Plan on using the pieces I removed for something like a fishplate on the inside of the rails. I'll slice a thin piece out of them so they will be in two pieces which will fit inside stock rail. Fully weld it all after that. Lastly, I will extended the frame boxing with another long section of 3/16" box plate to cover the whole area. Be much stronger than before and look a lot cleaner.
After that, I'll cut out the factory mid-crossmember and replace with a design of my own, more fitting to what I need. Anyway, here's a quick pic.

sectioned.jpg
 
Back
Top