• Hello there guest and Welcome to The #1 Classic Mustang forum!
    To gain full access you must Register. Registration is free and it takes only a few moments to complete.
    Already a member? Login here then!

Eleanor Coupe project history

tarafied1

Well-Known Member
I thought it would be cool if we all do a project history page. There are a lot of cool rides here now and many have been built or modified over time. It would be cool if we have a page for the history to see what all has been done.

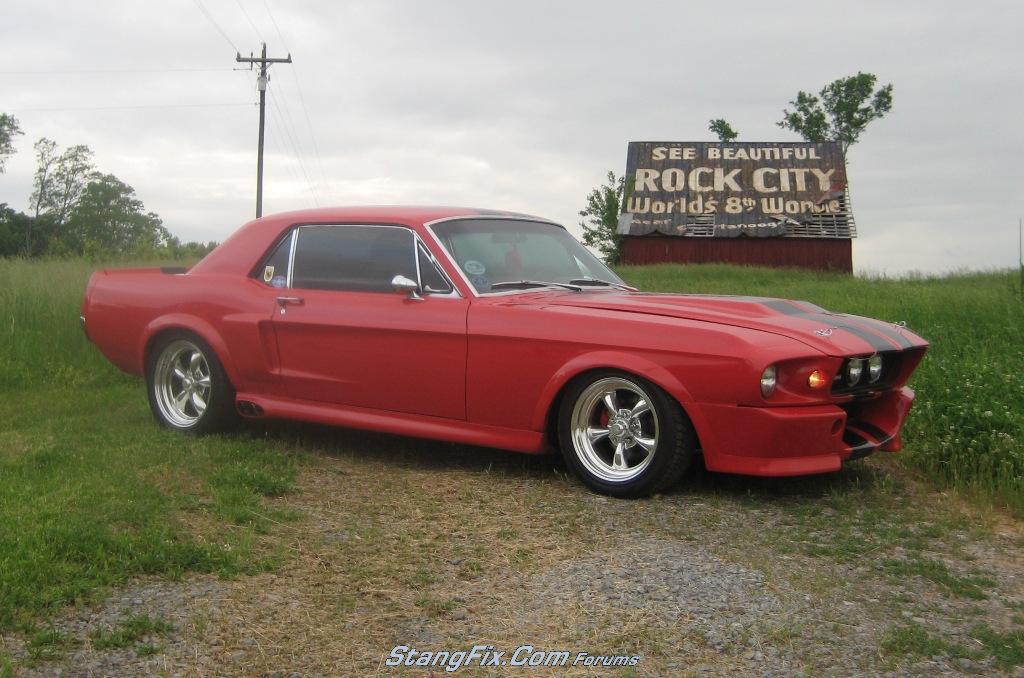
My car has been in it’s current state (not finished but mostly done) for two years now.
72_16_05_09_8_20_15.jpg


I started on it in 1990. It was rusty but I didn’t think it was as bad as it turned out to be.
myrusty67ku4.jpg

72_04_12_08_10_05_36_0.jpg

72_04_12_08_10_05_36_1.jpg

2nd67dxs8.jpg

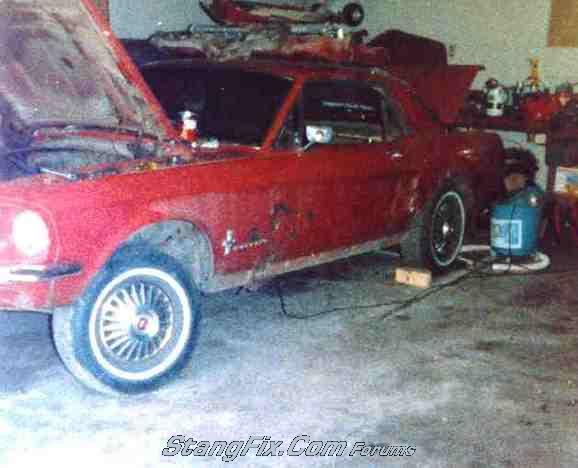
I put new quarters, floor boards, wheel wells, fenders, etc. on it in the early 90's and primed it. My 1st wife left when my oldest son was about 7 months old, I was a single dad for about 3 years. I remarried in 94. My wife even got into the project
hpim0588qp2.jpg

I stuffed a 460 in it in 92 or 93.
photodisplay.php

2nd67460yh1.jpg

Crites motor mounts
photodisplay.php

photodisplay.php

It sat around a lot as I had two more boys and relocated twice for work.
67inky2001ph1.jpg

I finally got busy working on it again and yanked the 460 to rebuild it. The block had been bored before and there was some core shift so a couple cylinders needed to be sleeved. I decided to look for a new block. I called around and found a guy who said he had a 429 with a 4 bolt main for $500. I bought it, built it up and put it in the Stang. I had a C6 in there but it leaked real bad so I had it rebuilt and had a shift kit put in. I was using Crites motor mounts and Tubular Automotive headers, 3" exhaust and 40 series Flowmasters, Granada Spindles and a Versailes 9" rear.
photodisplay.php

28428690008_medium.jpg

28428690006_medium.jpg

outsideunderownpower6gg8.jpg

may06025ep9.jpg

460429headerssmallfilevj0.jpg

28428690107_medium.jpg

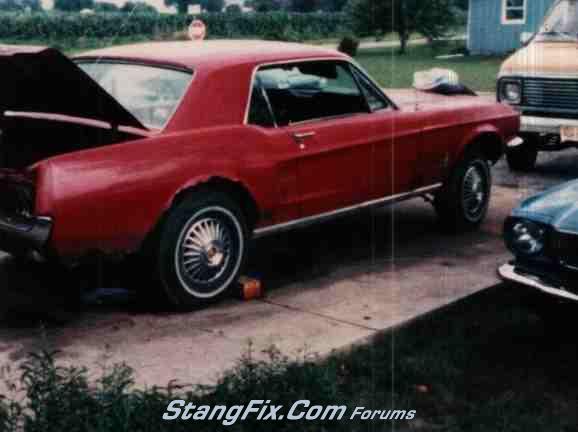
my wife got tired of the multi-color look so we decided to prime it all one color.
b4primertq4.jpg

67and70atbeachbendwy1.jpg

28428690095_medium.jpg

july06055ql1.jpg

It remained this way for a while...
More to come
 
Last edited by a moderator:
To continue with the history, I started on the interior next. The instrument cluster was a standard 67 cluster with no tach. This car has been a budget operation so rather than spend $1000+ on Phantom gauges (which are really cool BTW) I decided to try and put a factory tach in. I bought a 67 Cougar tach cluster on ebay for $45. I put the tach in but it took a little fabricating. The Cougar cluster depth was different than the Stang. I had to make the "cup" deeper. I also put a 68 oil pressure gauge in the where the clock was. The 67 had the oil pressure in the large cluster and in 68 they switched it with the fuel gauge. Since I gave up the oil pressure gauge for the tach I thought it would be good to add the 68 gauge. I don't have an amp gauge yet.
mvc045szt8.jpg

instrumentcloseuptr6.jpg

2842869_68.jpg

2842869_69.jpg

mvc043sbh1.jpg

mvc046sga3.jpg

mvc002sox2.jpg

I also changed the bulb covers from blue/green to red/orange and to make the faces all match I bought a white face kit.
mvc069stj7.jpg

photodisplay.php

photodisplay.php

photodisplay.php

smalldashwithredlightscw9.jpg

My wife put in the headliner...
smallheadlinerinstallrs4.jpg

june06144ho8.jpg

2842869_58.jpg

2842869_59.jpg

2842869_60.jpg

she also re-aposltered the seats
toasterstrippingrearseatcf5.jpg

2842869_61.jpg

2842869_62.jpg

I added a "humphugger" console and ran without a radio for a while
2842869_98.jpg

I have since, added a stereo and kick panel speakers
28428690133_medium.jpg

still more to come!
 
Last edited by a moderator:
Man, she did a very nice job on the headliner!

You willing to job-shop her out?
 
Thanks, yes she did a great job! I do let her drive but she doesn't like the manual steering and non-power brakes.
She says that she will never do another car interior but I think I could twist her arm, well bribe her at Kay jewelers!
 
My plan was to build a "Little Red" or "Green Hornet" style car. I have always wanted a Shelby but could never afford one. It was also difficult to find a fastback I could afford even back then.
photodisplay.php

photodisplay.php

I like the coupe bodystyle and I have always had one since I was 15 so I decided I would build my own "Super Coupe"
When the remake of Gone in 60 Seconds came out I just flipped over the "Eleanor" car and decided right then I would use that style on my car.
I had already done the rear trunk and tail lights so the next step was the nose.
photodisplay.php

photodisplay.php

photodisplay.php

photodisplay.php

photodisplay.php
 
Last edited by a moderator:
all the fiberglass was a real challenge. I also had repop fenders and quarters which I'm sure added to the pain!
In fact the fenders were the worst fitting of all the parts...
here are some before and after of the door area.
index.php

index.php
 
Yeah, I sure can. The trunk/quarter end caps were the first thing I delt with. The end caps fit terrible. I had to cut and build-up the parts to get them close. Eventually building them into the body and cutting them back off.
photodisplay.php

photodisplay.php

The trunk lid didn't fit too bad.
The upper nose was the worst and took the most work, the hood had a bow in it but we tweaked the fenders to match. The lower nose, flares and scoops weren't too bad.
photodisplay.php

I actually had to do the most work on the fenders to get hem to fit at the doors and cowl. If I had known they would be that bad I would have patched the original fenders!
 
Last edited by a moderator:
as you may have noticed, I also had to replace the trunk floor, wheel wells and partial rear frame rails and lower tail panel area...
photodisplay.php

photodisplay.php

photodisplay.php

photodisplay.php

but that's not all!!! More to come.
 
Last edited by a moderator:
Nice build i too have a 67 coupe and a 67 shelby bodykit sitting in riverside at my pals place waiting to get started one day.
 
"lethal289" said:
wow, you've got some serious talent!
thanks, I don't know about that. I have always been good with the mechanical stuff. A lot of the bodywork was my first time at stuff this major.

"GT350" said:
Nice build i too have a 67 coupe and a 67 shelby bodykit sitting in riverside at my pals place waiting to get started one day.
Cool, you guys need to start threads on your projects too. Maybe Sluggo will link them into a sticky for members projects or something like that.
 
"tarafied1" said:
Cool, you guys need to start threads on your projects too. Maybe Sluggo will link them into a stick for members projects or something like that.
I think thats a great idea. A members build page. Maybe even link it to the member profile!
 
"lethal289" said:
I think thats a great idea. A members build page. Maybe even link it to the member profile!
that would be perfect!

Well, as the rear of the car was coming together I thought I was close to paint, so I searched and found a Rod and Custom shop I liked and he said I could work on the car in his shop. We hauled to the shop and began to strip it down to the bare shell.
28428690105_medium.jpg

28428690028_medium.jpg

After pulling off the front suspension and pulling out the engine and trans, we chisled the crud out from the shock towers and found the Titanic, well it looked as rusty and full of holes as the Titanic anyway!
photodisplay.php

photodisplay.php

so we cut off the front end one side at a time...
photodisplay.php

you'll probably notice there is no torque box on the passenger side, weird. Anyway, I planned to add one and sub-frame connectors anyway...
Starting to go back together
photodisplay.php

so now I can cut off the other side
photodisplay.php

photodisplay.php

photodisplay.php

epoxy primed and painted the front clip, and started reassembly, including the 1" Shelby Drop.
photodisplay.php

28428690040_medium.jpg

also added Competition Engineering sub-frame connectors
photodisplay.php

photodisplay.php

I even painted my steering column, not concores with the black on the end but I didn't want red sticking in the engine compartment.
photodisplay.php
 
Last edited by a moderator:
Back
Top