• Hello there guest and Welcome to The #1 Classic Mustang forum!
    To gain full access you must Register. Registration is free and it takes only a few moments to complete.
    Already a member? Login here then!

Re-restoration in progress for some vintage racing

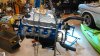
Nice! Mark, is that the right water pump? I had to take a look at the dip stick. I have a Canton pan also. I wasn't inspired by it's design just sticking straight out without any support. It was a out 1/4" off the terminals on the alternator. I folded a piece of flat stock off a shelf support, folded it around a 3/8" bolt and drilled a 7/16" hole on it. I put a slight offset bend in the tubing and bolted it to a boss on the block just behind the alternator. Nice and tight now.

Went to put the pressure plate on my new old motor. Forgot the 5.0 style flywheel uses M8 and not 5/16. Put a screeching halt to my weekend plans.
 

Attachments

  • KIMG0635.jpg
    KIMG0635.jpg
    966.7 KB · Views: 28
The water pump is a Flowcooler unit. Worked fine on the dyno.


Sent from my iPhone using Smackatalk
 
If you mean the lower water pump hose yes it's the same as before. inlet from the radiator at the bottom drover side and outlet is at the top passenger side.


Sent from my iPhone using Smackatalk
 
Ah, ok. I was just wondering if the wrong style pump was put on for your radiator. I didn't know what set up the old motor was.
 
Ah, ok. I was just wondering if the wrong style pump was put on for your radiator. I didn't know what set up the old motor was.

I tried to keep as much the same as I could. The motor cost was enough! Besides, I've never had an overheating problem with that cross flow setup.
 
Man, I forgot how much a PITA it is to get all the little parts to finish up the engine before installation. If anyone needs -6 and -10AN fittings, let me know before you order...I may just have them!

Switching all the engine compartment black rubber fuel lines to SS hose and -6AN fittings. Running vent tubes from valve covers to catch can with -10AN fittings. All are red/blue. There is NOTHING available here in Ames. When I asked around for the offset dowels to zero the bellhousing, you would have thought I just landed in a cigar shaped spaceship! Went to install the t-stat and find that the housing has no recessed lip for the TS to sit into. WT frack??? How did that slip by??? Even with Amazon Prime it's still taking forever to gather up all the little parts.
 
Mark, do you have your headers in yet? I just got my motor in. I was going to use the stock exhaust manifolds temporarily since all the leaves have fallen off the money tree for a new exhaust. Since it's a roller block I have to use one of those adapters for the Z bar but the inner stud on the manifold occupies the same space as the bracket. I'm just wondering if I'm going to have to lift the motor. I'm just frustrated at this point because I just don't have all that much time to work on the car and having to take 2 steps back gets maddening. The old exhaust system is pretty rusty I'm not sure how it's going to take to welding. I have the same MAC headers as you.

I'd seriously think about running open header if I didn't have a expired inspection sticker.
 
Haven't test fit the headers yet. Maybe sometime this week yet. Time is tight as we are moving to a new house this week. Just fit the scattershield to the new block yesterday. It actually wasn't out that much. Only needed .007" offset dowels to get it within tolerance! Give me a few days and I'll see how they fit. They did come highly recommended by other vintage racers!
 
MAC make a really nice 2.5" mandrel bent system for our cars. But it's not cheap. The H pipe is $200, the intermediate are $73 for the pair and tails are like $200 for the pair. I think their mufflers are $150 for the pair.
 
MAC make a really nice 2.5" mandrel bent system for our cars. But it's not cheap. The H pipe is $200, the intermediate are $73 for the pair and tails are like $200 for the pair. I think their mufflers are $150 for the pair.

I make my own exhaust. Simple to do when coming out the side


Sent from my iPhone using Smackatalk
 
A little progress today. Epoxy primer done.

Epoxy%20primer%20engine.jpg


Epoxy%20primer%20scattershield.jpg
 
This weekend when I'm home I'll see what I can cobble together at least to get it up and running. The Summit 2.25" universal kit and side exhaust seems to be in the running at this time. It only has to last 49.9 miles
 
This weekend when I'm home I'll see what I can cobble together at least to get it up and running. The Summit 2.25" universal kit and side exhaust seems to be in the running at this time. It only has to last 49.9 miles

LOL
 
Finished up the house move this morning. Went over to the shop this afternoon and put some blue to the new engine and bellhousing.

IMG_0282.jpg


IMG_0283.jpg


IMG_0284.jpg


Hmmm, the lighting is terrible!
 
Needed a new T-stat housing. Found one on Ebay from Collier's Classics. Looks like it was just machined! Big chunk of aluminum that was made in Taiwan. Even came with a gasket! It was inexpensive as well.

IMG_0303.jpg


IMG_0302.jpg


IMG_0301.jpg


IMG_0300.jpg
 
Fitting the new Mac Headers to the engine and bellhousing. It does need some work to get them all to fit! Need to grind one area of the bellhousing lip to accommodate the #5 tube. Also have to modify the clutch equalizer bolt so it has clearance to operate. I think if I extend it out from the block about 1/2", it should work. Won't know for sure till the motor is back in the car. The biggest problem I found is that the Powermaster mini starter I've used now for 12 years won't fit this block. It fits in the large hole, but when you rotate it to line the bolt holes up, the top of the starter hits the block. Waaaay too much to just grind the block down. Besides, that's where the serial number resides. Maybe I need a new starter that fits the Boss block?

b8665aa3-faa2-42d5-bc72-5e2197c86af8.jpg


7e77b0b8-56ee-4035-a2ac-405f24cf6617.jpg
 
Back
Top